
I spent an embarrassing amount of time buying cheap lens filters trying to get that washed-out, analog warmth in-camera. Spent maybe $40 total across four different options, none of which gave me consistent results. The effect I was chasing the whole time was achievable in Photoshop in about ten minutes, and I only figured that out when I sat down with this Aaron Nace tutorial from PHLEARN. Watch the full tutorial on YouTube
What makes this walkthrough worth your time is that Nace isn’t applying a preset or running an action. He’s building the effect from scratch using curves, blend modes, and layer masks, which means you actually understand what’s happening and can adjust it for any image. For anyone who shoots portraits, street, or anything with an analog or editorial bent, this technique is a legitimate time-saver. The result looks like what people are actually paying Lightroom preset packs to approximate.
The source image is a portrait with some blown-out highlights, which is actually a feature here, not a bug. Overexposed areas become the canvas for the light leak effect. Here’s how the whole thing breaks down.
Step 1: Recover Highlight Detail with a Curves Adjustment Layer
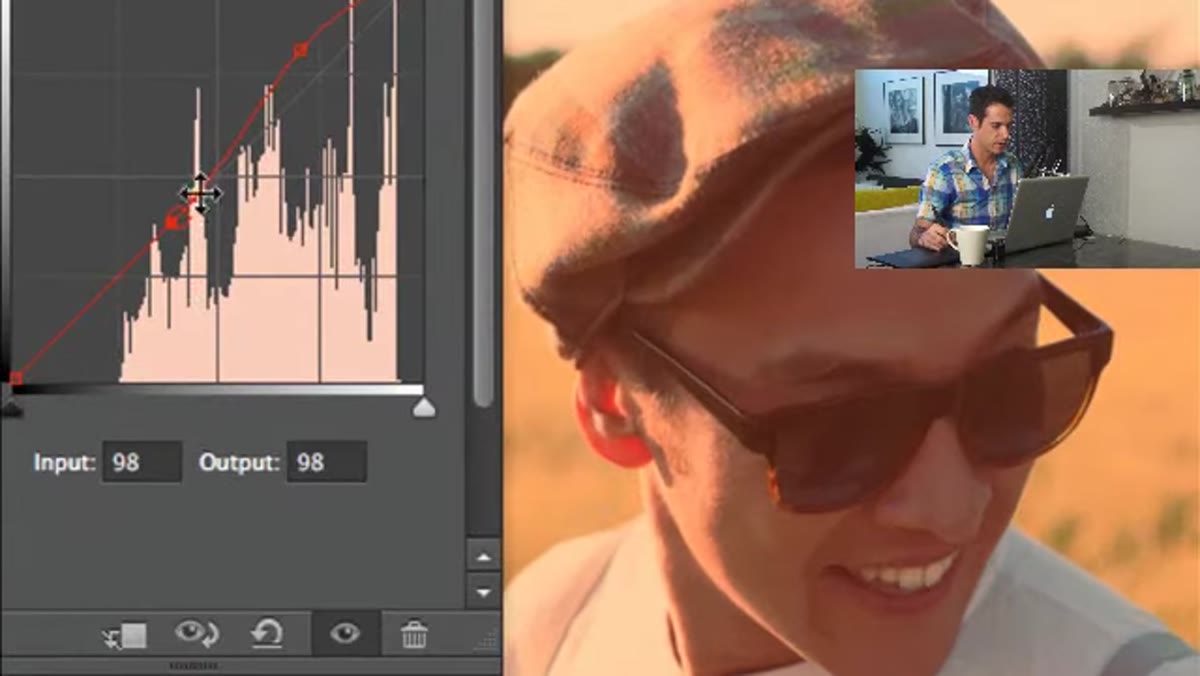
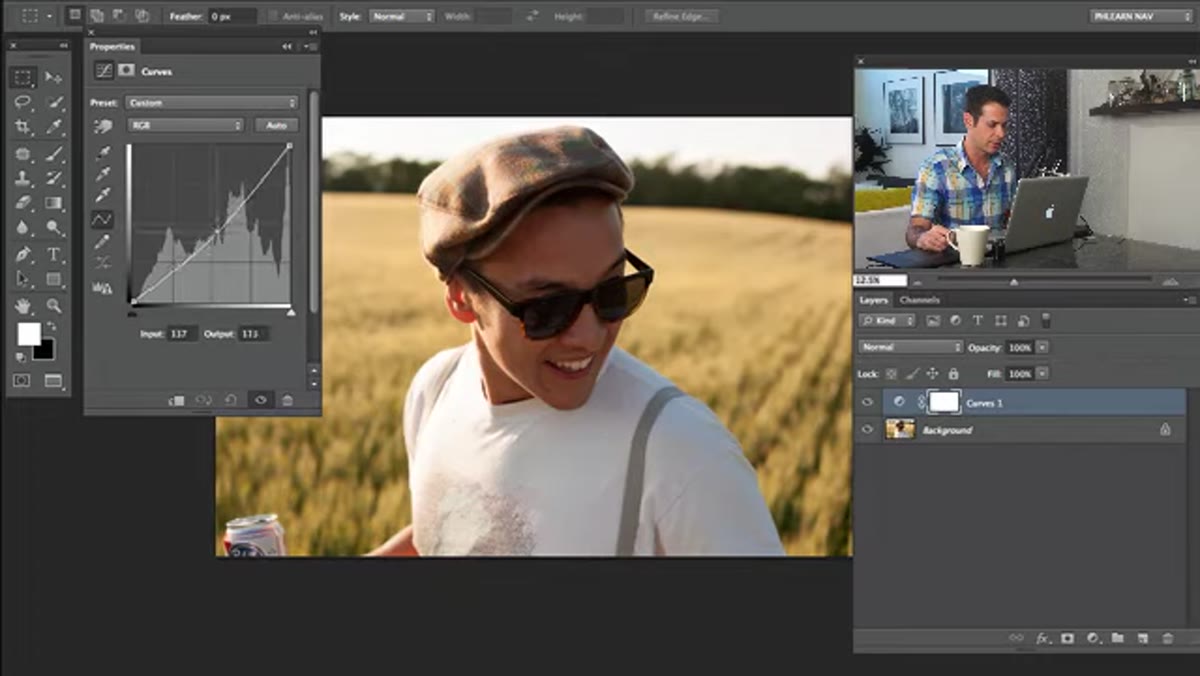 Curves adjustment layer being added above portrait layer
Pull up a Curves adjustment layer and drag the top-right point of the curve downward. This brings back luminosity in the blown-out areas. It won’t restore data that isn’t there, but it will tone down the clipping and give you something to work with. The key move here is switching into individual color channels. Drop into the Blue channel and pull it down slightly, which shifts those overexposed zones toward yellow. Then move into the Green channel and drag it down a touch, which nudges things toward magenta. The combination reads as warm and organic rather than artificially color-graded.
Curves adjustment layer being added above portrait layer
Pull up a Curves adjustment layer and drag the top-right point of the curve downward. This brings back luminosity in the blown-out areas. It won’t restore data that isn’t there, but it will tone down the clipping and give you something to work with. The key move here is switching into individual color channels. Drop into the Blue channel and pull it down slightly, which shifts those overexposed zones toward yellow. Then move into the Green channel and drag it down a touch, which nudges things toward magenta. The combination reads as warm and organic rather than artificially color-graded.
Step 2: Use Apply Image to Mask the Curves Effect
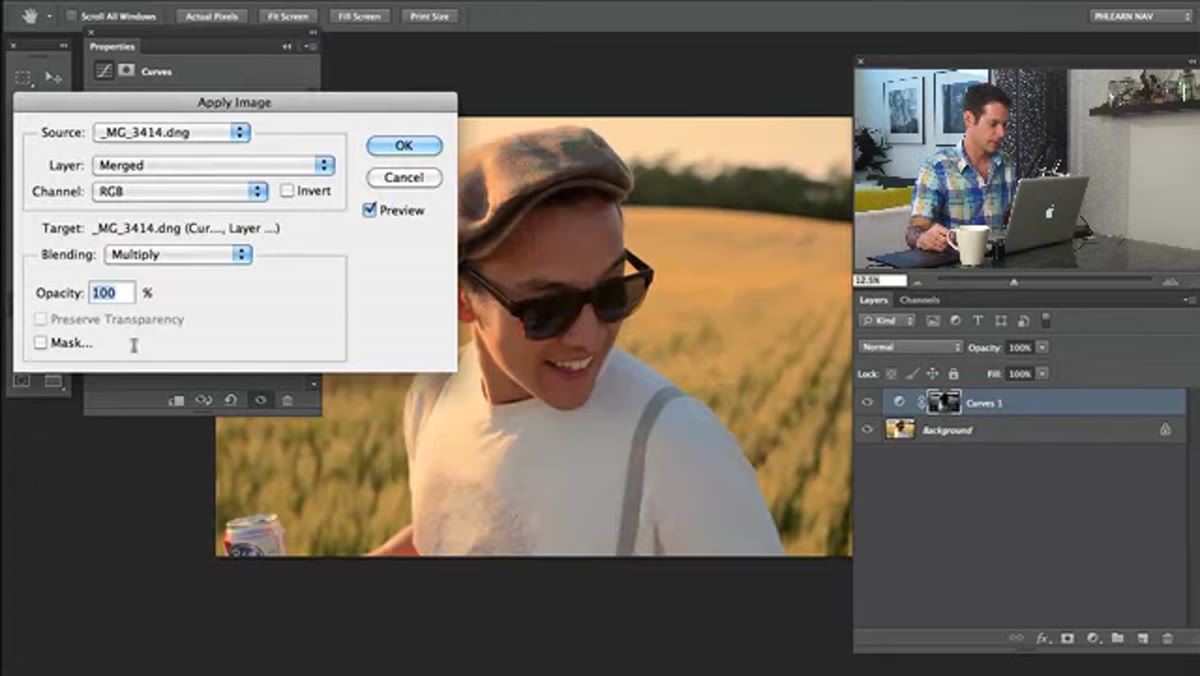 Apply Image dialog open on the Curves layer mask
This is the step that most tutorials skip, and it’s the whole reason the technique works cleanly. Click on the layer mask thumbnail for your Curves adjustment layer, then go to Image and select Apply Image. Leave everything at the default settings and hit OK. What this does is paint the mask based on the luminosity of the image itself, so the curves correction automatically concentrates in the brightest areas and fades out in the midtones and shadows. Lower the opacity of the Curves layer to somewhere in the 50 to 70 percent range depending on your image. The result is a targeted highlight recovery that actually looks like it belongs to the photograph.
Apply Image dialog open on the Curves layer mask
This is the step that most tutorials skip, and it’s the whole reason the technique works cleanly. Click on the layer mask thumbnail for your Curves adjustment layer, then go to Image and select Apply Image. Leave everything at the default settings and hit OK. What this does is paint the mask based on the luminosity of the image itself, so the curves correction automatically concentrates in the brightest areas and fades out in the midtones and shadows. Lower the opacity of the Curves layer to somewhere in the 50 to 70 percent range depending on your image. The result is a targeted highlight recovery that actually looks like it belongs to the photograph.
Step 3: Add a Color Fill Layer Set to Lighten Blend Mode
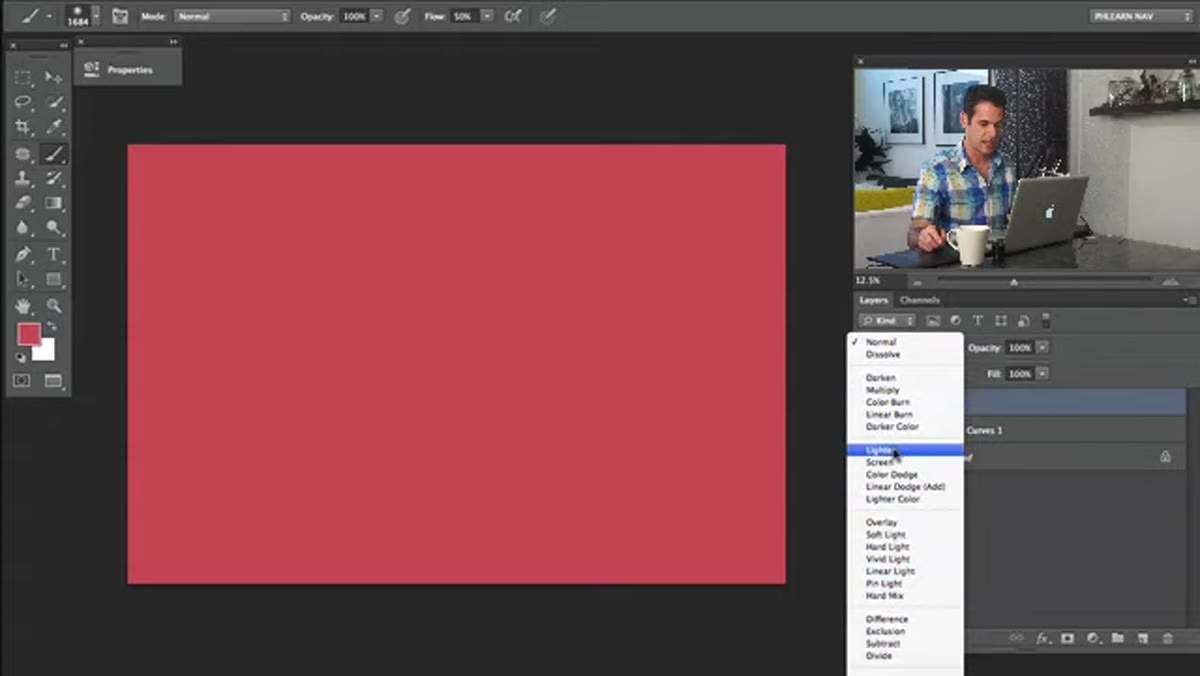 Solid color layer blend mode set to Lighten
Create a new layer, pick any color from the color picker, and fill the entire layer using Alt+Delete (Option+Delete on Mac). Don’t agonize over the color choice yet. Change the blend mode of this layer from Normal to Lighten. In Lighten mode, the layer only affects pixels that are darker than the fill color, which means it contributes warmth and color to the midtones and highlights while leaving the dark areas of the image mostly untouched. It’s a gentle overlay that doesn’t blow everything out the way a Screen blend would.
Solid color layer blend mode set to Lighten
Create a new layer, pick any color from the color picker, and fill the entire layer using Alt+Delete (Option+Delete on Mac). Don’t agonize over the color choice yet. Change the blend mode of this layer from Normal to Lighten. In Lighten mode, the layer only affects pixels that are darker than the fill color, which means it contributes warmth and color to the midtones and highlights while leaving the dark areas of the image mostly untouched. It’s a gentle overlay that doesn’t blow everything out the way a Screen blend would.
Step 4: Dial In the Color with Hue/Saturation
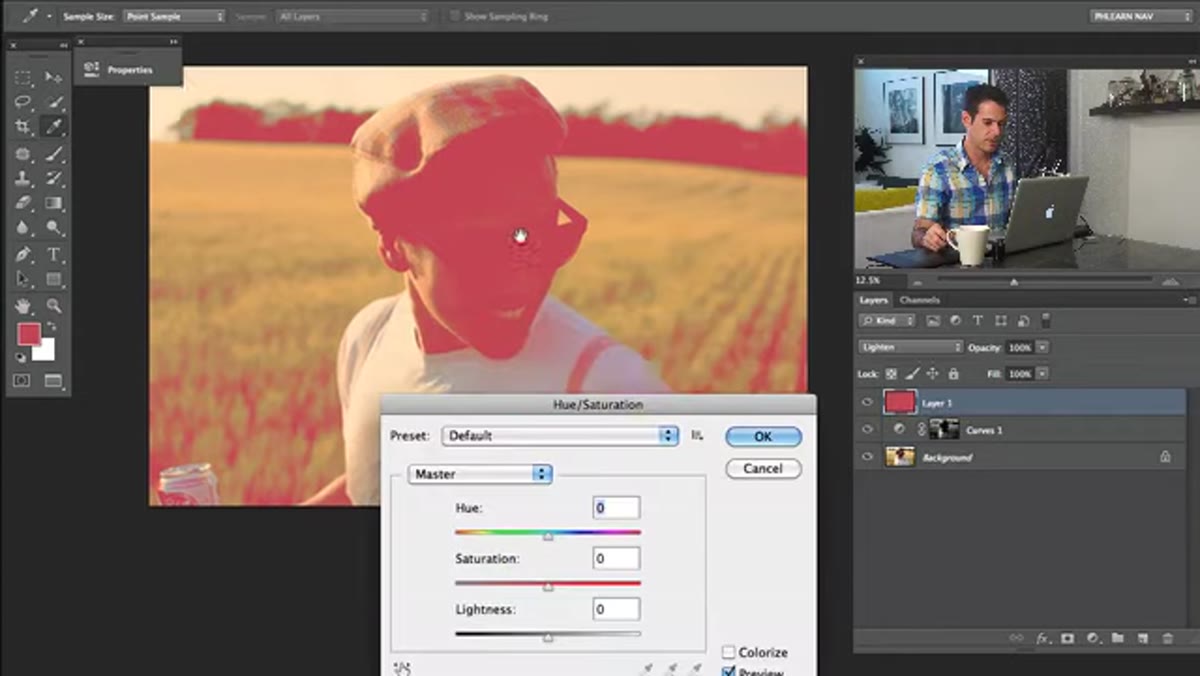 Hue/Saturation dialog open, hue slider being adjusted
Once the Lighten layer is in place, hit Command+U (Ctrl+U on Windows) to open Hue/Saturation. Now you can slide the Hue all the way around the spectrum and watch the color tone of the image shift in real time. This is where you actually land on your look. Nace settles into a warm amber-orange range that reads as golden hour analog film. Bring the Lightness down a bit to keep things from going chalky, and nudge the Saturation to taste. The goal is a color that feels like it was baked into the scene, not painted over it.
Hue/Saturation dialog open, hue slider being adjusted
Once the Lighten layer is in place, hit Command+U (Ctrl+U on Windows) to open Hue/Saturation. Now you can slide the Hue all the way around the spectrum and watch the color tone of the image shift in real time. This is where you actually land on your look. Nace settles into a warm amber-orange range that reads as golden hour analog film. Bring the Lightness down a bit to keep things from going chalky, and nudge the Saturation to taste. The goal is a color that feels like it was baked into the scene, not painted over it.
Step 5: Add a Second Color Layer Set to Darken for Shadow Toning
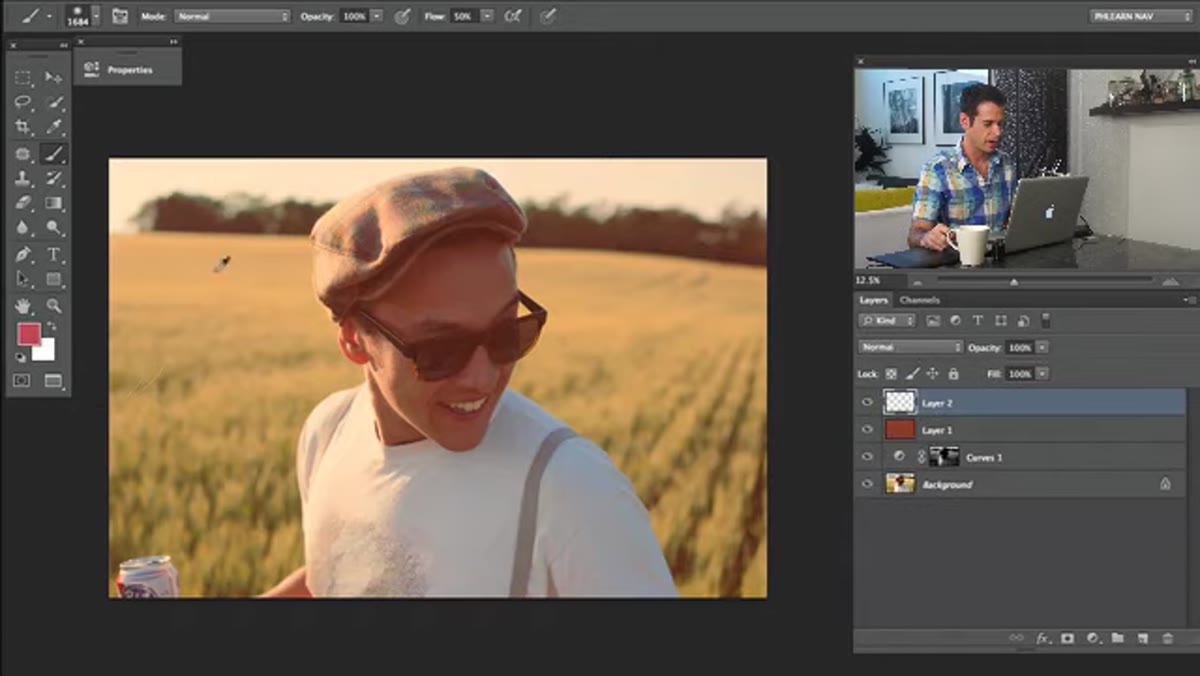 Second color fill layer, blend mode set to Darken
Duplicate the process with a second solid color layer, but this time set the blend mode to Darken instead of Lighten. Where the Lighten layer affected your brighter tones, the Darken layer targets the shadows and lower midtones. Use a cooler color here, something in the blue or teal family, to create separation between your highlights and shadows. The contrast between a warm highlight tone and a cooler shadow tone is what gives the final image that cross-processed film look. Adjust the opacity on both layers independently until the balance feels right.
Second color fill layer, blend mode set to Darken
Duplicate the process with a second solid color layer, but this time set the blend mode to Darken instead of Lighten. Where the Lighten layer affected your brighter tones, the Darken layer targets the shadows and lower midtones. Use a cooler color here, something in the blue or teal family, to create separation between your highlights and shadows. The contrast between a warm highlight tone and a cooler shadow tone is what gives the final image that cross-processed film look. Adjust the opacity on both layers independently until the balance feels right.
Step 6: Paint in the Light Leak with a Soft Brush
 Soft brush painting warm color on edges of frame
Create a new blank layer above everything and set it to Screen blend mode. Choose a warm color, something in the orange-to-red range, pick a large soft brush, drop your opacity to around 20 to 30 percent, and paint along one edge or corner of the frame. Build it up gradually with multiple strokes rather than one heavy pass. The Screen blend mode makes the painted color behave like light hitting the frame, which is exactly the analog light leak effect. You can also add a second smaller bloom using a yellow-white color in the center or opposite corner for a lens flare feel.
Soft brush painting warm color on edges of frame
Create a new blank layer above everything and set it to Screen blend mode. Choose a warm color, something in the orange-to-red range, pick a large soft brush, drop your opacity to around 20 to 30 percent, and paint along one edge or corner of the frame. Build it up gradually with multiple strokes rather than one heavy pass. The Screen blend mode makes the painted color behave like light hitting the frame, which is exactly the analog light leak effect. You can also add a second smaller bloom using a yellow-white color in the center or opposite corner for a lens flare feel.
What I’d Do Differently: Use This on Raw Conversions, Not Final JPEGs
The one thing I’d add from my own workflow: this technique rewards raw files. When I’ve applied it to JPEGs that were already baked-in with a camera picture profile, the color layers interact awkwardly and the shadows get muddy faster. If you’re shooting raw and doing your initial conversion in Lightroom or Camera Raw first, bring it into Photoshop with the whites and blacks already roughly balanced before you start stacking these layers. The Apply Image mask step in particular works much cleaner when the tonal range isn’t compressed to begin with. A well-exposed raw file with a neutral profile gives you the full range of pixels to work with, and the Lighten and Darken layers behave exactly the way Nace demonstrates.
The biggest takeaway here is that vintage and film effects are not a preset problem. They’re a layer logic problem. Once you understand that Lighten blend mode targets highlights, Darken targets shadows, and Apply Image can use the image itself as a mask, you can build any variation of this effect from scratch in a few minutes. No plugin subscriptions, no preset packs, no filter purchases I definitely didn’t need.
Watch the full tutorial on YouTube to see Nace work through the complete effect, including some additional light streak and flare techniques that go beyond what I’ve covered here.
Comments
Leave a Comment