
Every few weeks someone in a photography forum drops the advice like it’s gospel: “Invest in glass first, bodies come and go.” I’ve heard it so many times I used to repeat it myself. And honestly, the logic sounds solid until you actually look at the numbers. I got burned chasing that advice early on, buying into the idea that a more expensive lens would automatically produce sharper, better images on whatever body I was running at the time. It doesn’t work that way, and once I understood why, I stopped making that mistake.
Watch the full tutorial on YouTube
In this Tony and Chelsea Northrup tutorial from their Photography Buying Guide series, Tony walks through exactly what happens when you mount a full frame lens on a crop sensor body, using real DxOMark measurements instead of gut feeling. What he finds is uncomfortable for anyone who has already spent serious money on full frame glass for a crop body. This isn’t just theory. He uses a concrete real-world example of someone who sent a $1,500 lens in for repairs twice because they thought it was broken. It wasn’t broken. The combination just wasn’t delivering what the shooter expected, and nobody told them the math before they bought.
Step 1: Understand the Two Numbers You Must Multiply
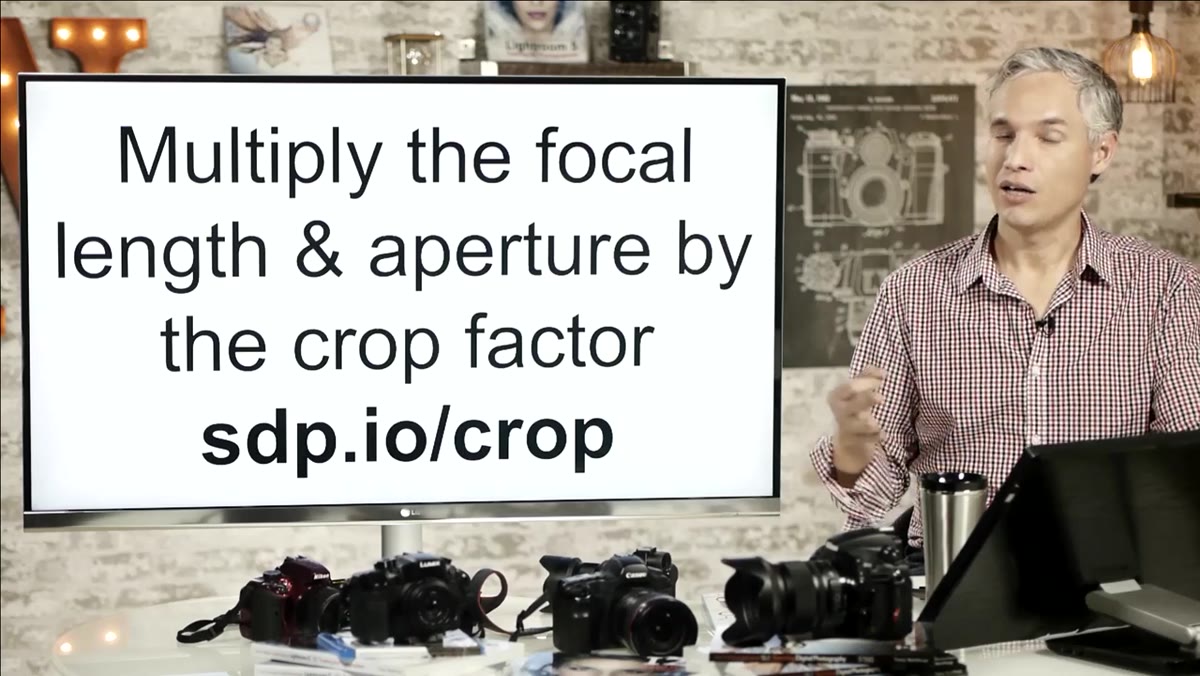 Diagram showing crop factor applied to focal length and aperture
Most photographers know to multiply focal length by the crop factor to get the equivalent field of view. A 50mm lens on a 1.5x crop body sees like a 75mm lens on full frame. That part people generally get right. What gets skipped is the aperture. You have to multiply the aperture by the crop factor too, because the effective depth of field and total light gathered changes just as much as the angle of view. Skipping that second multiplication paints an inaccurate picture of what you’re actually getting.
Diagram showing crop factor applied to focal length and aperture
Most photographers know to multiply focal length by the crop factor to get the equivalent field of view. A 50mm lens on a 1.5x crop body sees like a 75mm lens on full frame. That part people generally get right. What gets skipped is the aperture. You have to multiply the aperture by the crop factor too, because the effective depth of field and total light gathered changes just as much as the angle of view. Skipping that second multiplication paints an inaccurate picture of what you’re actually getting.
If you only account for focal length, you’re overstating what the lens can do on your camera. The aperture number stamped on the lens is only fully true when that lens is on the sensor format it was designed for.
Step 2: Apply the Crop Factor to a Real-World Example
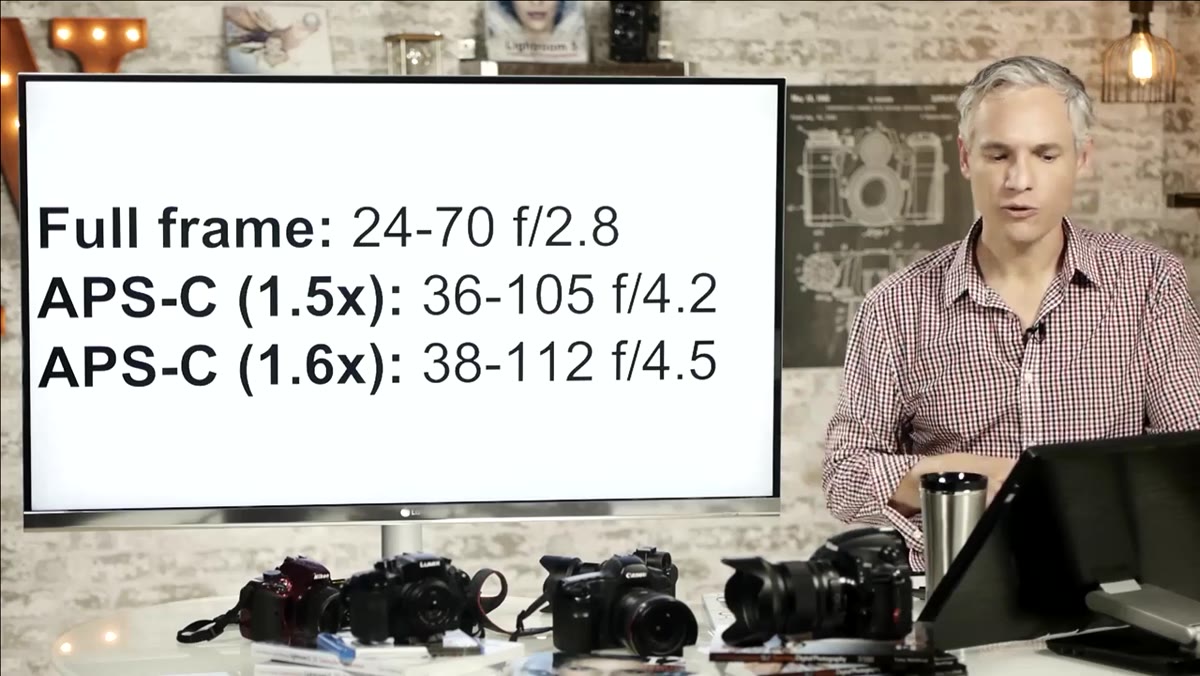 Text showing 24-70 f/2.8 converting to 36-105mm f/4.2 on crop body
Take the 24-70mm f/2.8, one of the most popular and expensive zoom lenses out there. On a Nikon or Sony APS-C body with a 1.5x crop factor, it stops behaving like a 24-70 f/2.8. It behaves like a 36-105mm f/4.2 would on a full frame body. That is a genuinely different lens. The wide end that made the 24-70 so useful for events, gatherings, and tight indoor spaces is gone. You’re starting at 36mm, which is noticeably more compressed, and you’ll constantly be backing up to fit people in frame.
Text showing 24-70 f/2.8 converting to 36-105mm f/4.2 on crop body
Take the 24-70mm f/2.8, one of the most popular and expensive zoom lenses out there. On a Nikon or Sony APS-C body with a 1.5x crop factor, it stops behaving like a 24-70 f/2.8. It behaves like a 36-105mm f/4.2 would on a full frame body. That is a genuinely different lens. The wide end that made the 24-70 so useful for events, gatherings, and tight indoor spaces is gone. You’re starting at 36mm, which is noticeably more compressed, and you’ll constantly be backing up to fit people in frame.
Canon shooters have a 1.6x crop factor, so the numbers shift even further. That same 24-70 becomes a 38-112mm f/4.5 equivalent. What felt like a flexible workhorse lens on full frame becomes a mid-range telephoto zoom that costs you a full stop of light.
Step 3: Run the Same Check on a Telephoto Lens
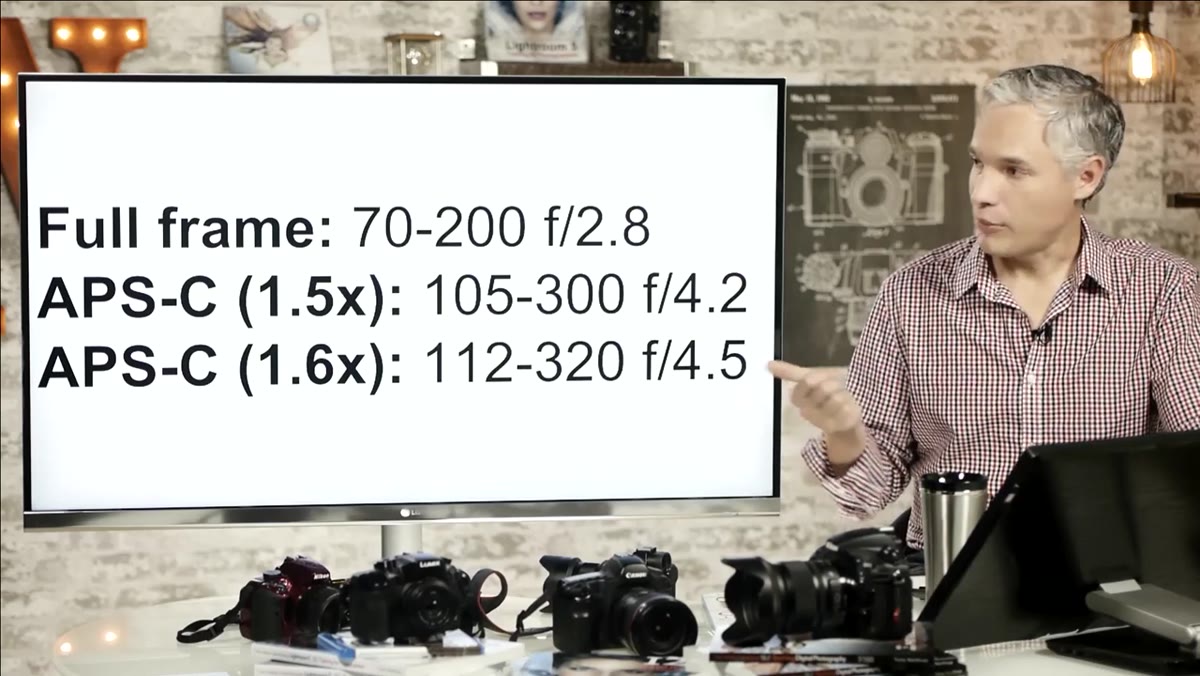 Text showing 70-200 f/2.8 converting to 100-300 f/4.2 on Nikon/Sony
The 70-200mm f/2.8 is another lens that frequently shows up on crop bodies because photographers use it for portraits and sports. On a Nikon or Sony crop body, it becomes a 105-300mm f/4.2 equivalent. On Canon, it’s closer to a 112-320mm f/4.5. That reach can actually work in your favor for sports or wildlife where you want more distance. But the depth of field and low-light performance you were counting on from that f/2.8 rating? That’s gone. You’re effectively shooting with an f/4-plus lens in terms of what the sensor sees.
Text showing 70-200 f/2.8 converting to 100-300 f/4.2 on Nikon/Sony
The 70-200mm f/2.8 is another lens that frequently shows up on crop bodies because photographers use it for portraits and sports. On a Nikon or Sony crop body, it becomes a 105-300mm f/4.2 equivalent. On Canon, it’s closer to a 112-320mm f/4.5. That reach can actually work in your favor for sports or wildlife where you want more distance. But the depth of field and low-light performance you were counting on from that f/2.8 rating? That’s gone. You’re effectively shooting with an f/4-plus lens in terms of what the sensor sees.
Before you buy any full frame lens for use on a crop body, run these numbers. Focal length times crop factor, aperture times crop factor. Write both down and ask yourself whether that adjusted lens still meets your needs.
Step 4: Look Up Perceptual Megapixels on DxOMark
 DxOMark website showing perceptual megapixel measurements for lens and body combinations
DxOMark measures something called perceptual megapixels, which represents how much actual resolved detail a specific lens and body combination produces. This is more useful than just knowing a sensor’s megapixel count, because a high-megapixel sensor paired with a soft lens will still produce soft images. You can check any lens-and-body pairing directly on their site to see the real-world output before you spend money.
DxOMark website showing perceptual megapixel measurements for lens and body combinations
DxOMark measures something called perceptual megapixels, which represents how much actual resolved detail a specific lens and body combination produces. This is more useful than just knowing a sensor’s megapixel count, because a high-megapixel sensor paired with a soft lens will still produce soft images. You can check any lens-and-body pairing directly on their site to see the real-world output before you spend money.
The process is straightforward. Go to DxOMark, pull up the lens you’re considering, and look at how it scores on the specific body you own. That single number tells you more about what your images will actually look like than any spec sheet will.
Step 5: Compare Combinations Before You Buy
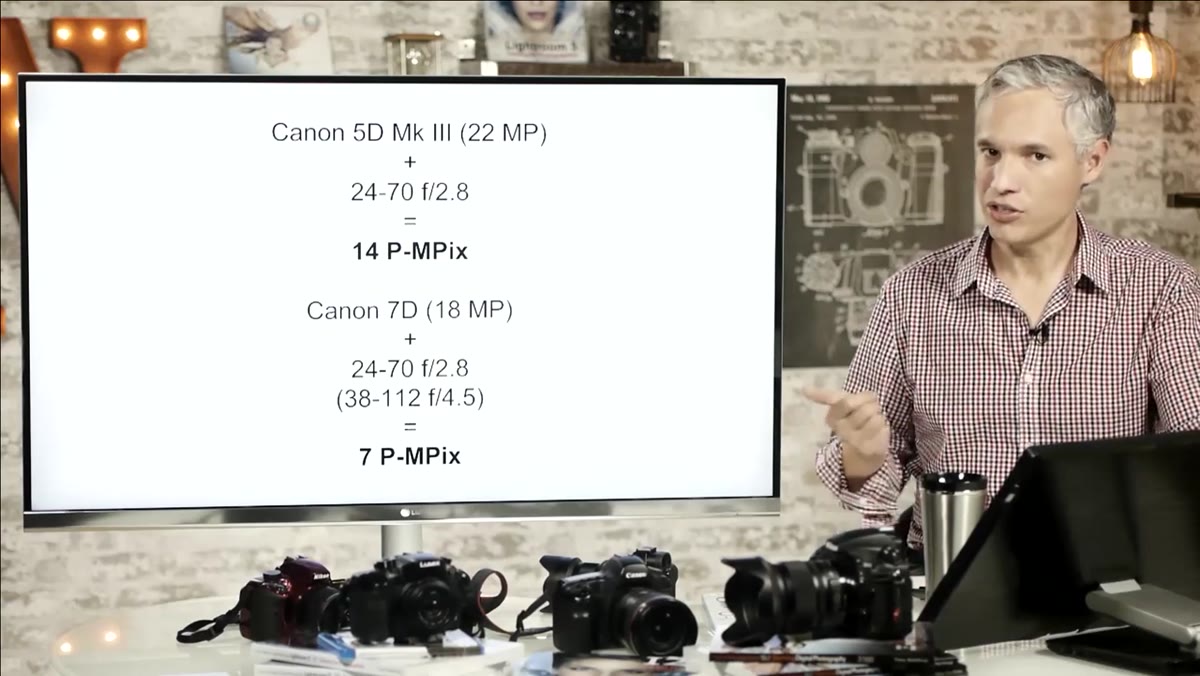
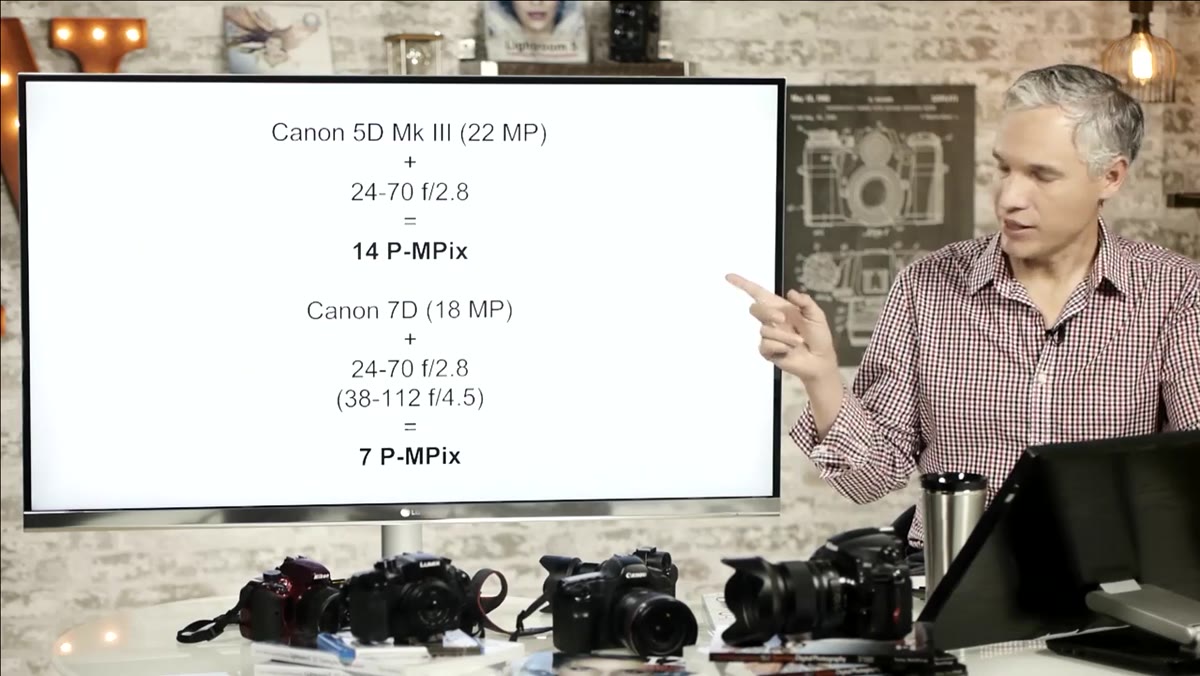 Canon 5D Mark III vs 7D comparison with 24-70 f/2.8 perceptual megapixels shown
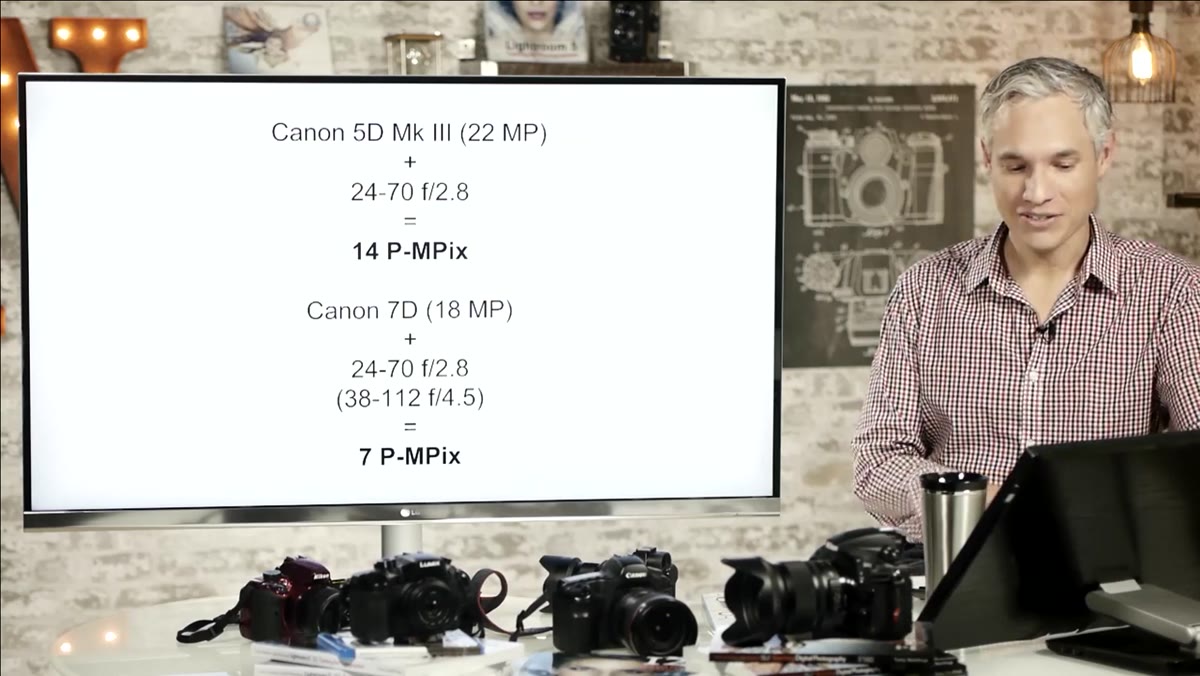
Tony uses a side-by-side comparison between a Canon 5D Mark III and a Canon 7D, both with the original 24-70 f/2.8. On the 5D Mark III, that combination produces around 14 perceptual megapixels. On the 7D, it drops to 7. That is not a rounding error. That is half the resolved detail, from the same lens, just mounted on a different body.
Canon 5D Mark III vs 7D comparison with 24-70 f/2.8 perceptual megapixels shown
Tony uses a side-by-side comparison between a Canon 5D Mark III and a Canon 7D, both with the original 24-70 f/2.8. On the 5D Mark III, that combination produces around 14 perceptual megapixels. On the 7D, it drops to 7. That is not a rounding error. That is half the resolved detail, from the same lens, just mounted on a different body.
The 7D shooter in this example sent the lens to Canon for repairs twice because the images looked soft. Canon found nothing wrong with the lens, because nothing was wrong with it. The problem was the combination. Meanwhile, the crop-native 18-135mm kit lens, which costs roughly $200, would have produced about 8 perceptual megapixels on that same 7D body, which is actually more than the $1,500 full frame lens delivered on that camera.
Step 6: Check Whether a Crop-Native Lens Outperforms Your Full Frame Option
 Kit lens perceptual megapixel result shown next to 24-70 f/2.8 result on 7D
Once you have DxOMark numbers in front of you, do one more comparison. Pull up a native crop sensor lens in the same focal range and check its perceptual megapixel score on the same body. Native APS-C lenses are designed around the smaller image circle, which often means optical engineers can optimize more aggressively for center sharpness in the range that actually gets used. That engineering advantage shows up in the numbers.
Kit lens perceptual megapixel result shown next to 24-70 f/2.8 result on 7D
Once you have DxOMark numbers in front of you, do one more comparison. Pull up a native crop sensor lens in the same focal range and check its perceptual megapixel score on the same body. Native APS-C lenses are designed around the smaller image circle, which often means optical engineers can optimize more aggressively for center sharpness in the range that actually gets used. That engineering advantage shows up in the numbers.
In many cases, a $300 to $500 crop-native lens will match or beat a $1,000-plus full frame lens when both are measured on the same APS-C body. That’s not always true, but it’s true often enough that you owe it to yourself to check before assuming the expensive option wins.
What I’d Add From My Own Testing
I’ve gone through this exercise with budget lenses specifically, and the results line up with everything Tony explains here. Some of the sharpest images I’ve pulled off an APS-C body came from crop-native primes that cost under $200. There are two situations where full frame glass makes genuine sense on a crop body: you already own it and plan to eventually move to a full frame body, or you need a focal length or aperture combination that simply doesn’t exist in a native crop mount. Outside of those two cases, you’re often paying a premium for a result that a cheaper, purpose-built lens would beat.
The “invest in glass” advice isn’t wrong by default, but it gets misapplied constantly. Glass is worth investing in when the glass is matched to the system you’re actually shooting on.
The single most important thing to walk away with here is this: multiply both the focal length AND the aperture by your crop factor before you evaluate any full frame lens for use on your crop body. That math changes the entire value calculation, and skipping it is how photographers end up spending $1,500 to get results a $200 kit lens would have beaten. Run the numbers, check DxOMark, and buy accordingly.
Watch the full tutorial on YouTube
Comments
Leave a Comment