I’ll be honest with you: I’ve spent an embarrassing amount of money chasing shallow depth of field. Budget lenses, fast primes, crop sensor math, the whole rabbit hole. So when Lightroom dropped its AI lens blur feature and photographers started losing their minds over it, my first thought wasn’t “cool new toy.” It was “does this actually hold up, or is it going to look like a phone portrait mode gone wrong?” Turns out, Photoshop has the same feature baked right in through Camera Raw, and in this Aaron Nace (PHLEARN) tutorial, he walks through exactly how to use it in a way that doesn’t look cheap. Watch the full tutorial on YouTube
What caught my attention is how practical the approach is. This isn’t about replacing a real f/1.8 lens. It’s about giving your already-solid shot that extra separation when the background is fighting your subject for attention. I’ve used it on product shots, portraits, even some landscape layering experiments. The key is restraint, and Nace hammers that point home throughout. Here’s the full breakdown so you can follow along without pausing the video every 30 seconds.
Step 1: Convert Your Layer to a Smart Object
 Converting background layer to Smart Object in Photoshop
Before you touch any filters, right-click your background layer in the Layers panel and convert it to a Smart Object. You can also get there through the Layer menu at the top, then Smart Objects, then Convert to Smart Object. You’ll see a small icon appear on the layer thumbnail confirming it worked.
Converting background layer to Smart Object in Photoshop
Before you touch any filters, right-click your background layer in the Layers panel and convert it to a Smart Object. You can also get there through the Layer menu at the top, then Smart Objects, then Convert to Smart Object. You’ll see a small icon appear on the layer thumbnail confirming it worked.
This matters because any filter you apply to a Smart Object becomes a Smart Filter, which means it stays editable and non-destructive. If you skip this step and apply the lens blur directly to a regular layer, you’re baking it in permanently. That’s a decision you will regret, especially when you want to dial the blur back after seeing the full edit.
Step 2: Open the Camera Raw Filter
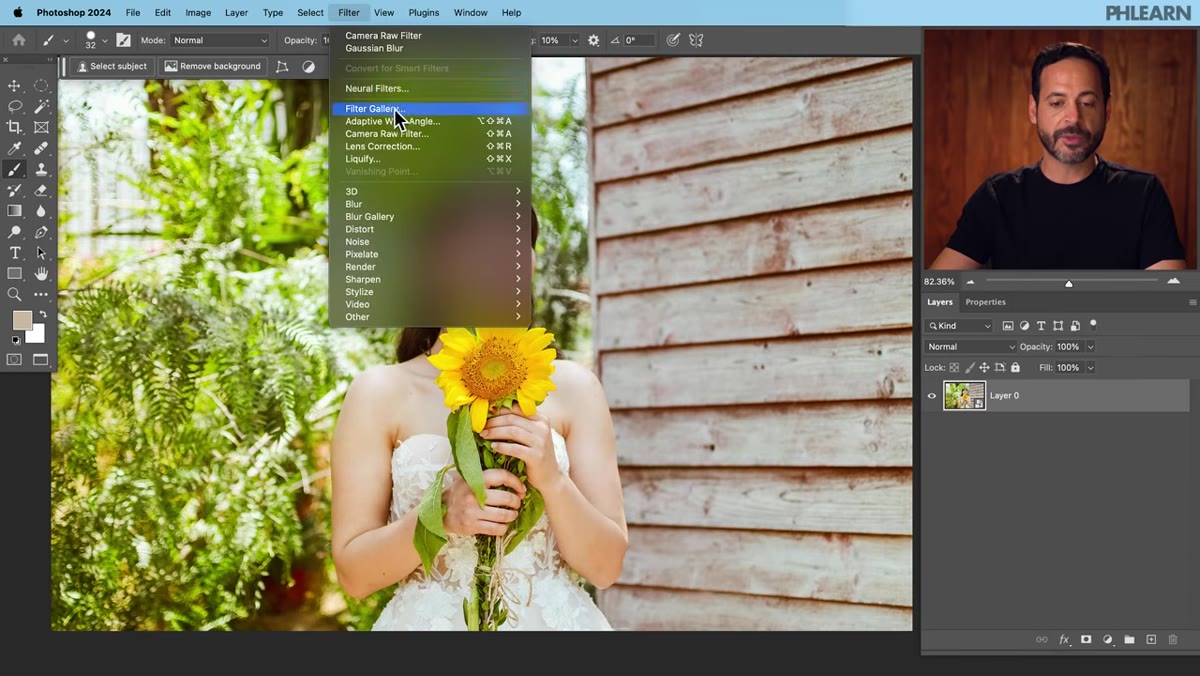 Navigating to Camera Raw Filter under the Filter menu
Go to Filter in the top menu bar, then select Camera Raw Filter. This opens the Camera Raw panel, which is essentially the same toolset you’d find in Lightroom. If you’re already comfortable in Lightroom, you’ll feel right at home. If you’re not, don’t worry. You only need one specific section for this technique.
Navigating to Camera Raw Filter under the Filter menu
Go to Filter in the top menu bar, then select Camera Raw Filter. This opens the Camera Raw panel, which is essentially the same toolset you’d find in Lightroom. If you’re already comfortable in Lightroom, you’ll feel right at home. If you’re not, don’t worry. You only need one specific section for this technique.
The Camera Raw Filter is genuinely underused in Photoshop. Most people think of it as a raw file converter, not a place to do creative work on layered documents. But because it mirrors Lightroom’s interface so closely, any masking, tonal work, or new AI features that Adobe rolls out in Lightroom tend to show up here too.
Step 3: Find and Enable Lens Blur
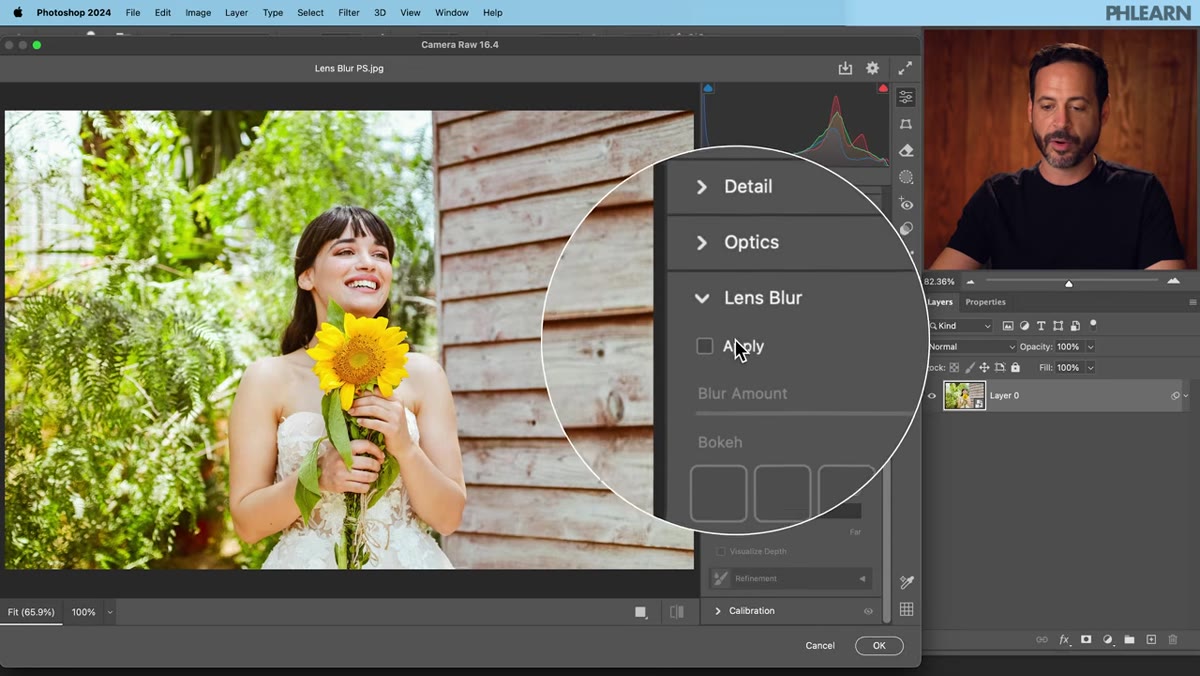 Lens Blur panel open with Apply checkbox visible
Scroll down in the Camera Raw panel until you find the Lens Blur section. Click to expand it, then check the Apply box to activate the effect. Photoshop will take a moment to process and generate an initial blur based on automatic subject detection. You’ll see the background go soft while your subject stays sharp, at least in theory.
Lens Blur panel open with Apply checkbox visible
Scroll down in the Camera Raw panel until you find the Lens Blur section. Click to expand it, then check the Apply box to activate the effect. Photoshop will take a moment to process and generate an initial blur based on automatic subject detection. You’ll see the background go soft while your subject stays sharp, at least in theory.
The automatic detection works better than I expected, but don’t trust it blindly. Complex edges like hair, fur, or anything with fine detail can bleed into the background blur in ways that look off. That leads directly to the next step.
Step 4: Use the Focus Target Tool to Set Your Subject Manually
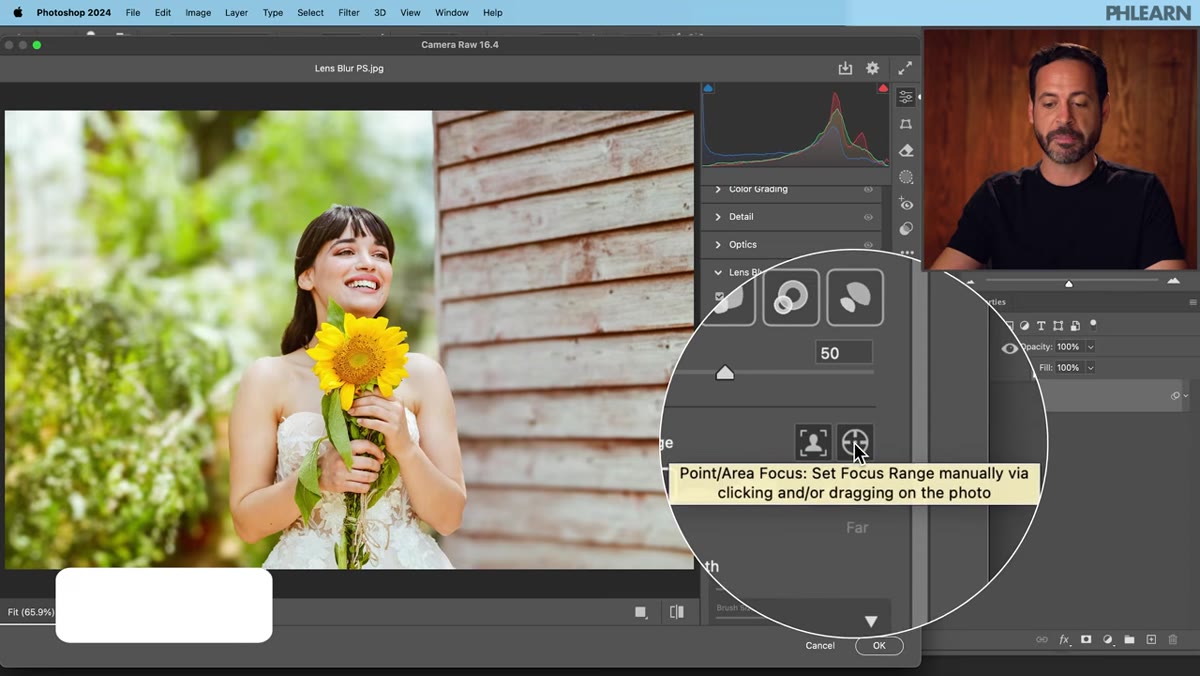 Clicking and dragging Focus Target tool over subject’s face
In the Lens Blur panel, look for the small target icon. Clicking it activates the Focus Target tool, which lets you manually drag a marquee selection around your subject rather than relying entirely on the AI to guess. Click and drag directly over your subject’s face or the main focal point of the image. When you release, Photoshop recalculates the blur map around what you’ve selected.
Clicking and dragging Focus Target tool over subject’s face
In the Lens Blur panel, look for the small target icon. Clicking it activates the Focus Target tool, which lets you manually drag a marquee selection around your subject rather than relying entirely on the AI to guess. Click and drag directly over your subject’s face or the main focal point of the image. When you release, Photoshop recalculates the blur map around what you’ve selected.
This one step is the difference between a result that looks intentional and one that looks like a mistake. The auto-detection gets close, but the manual target gives the algorithm a clearer anchor to work from. Nace makes this his default approach in the tutorial, and after testing both methods myself, I do too.
Step 5: Adjust Blur Amount and Bokeh Style
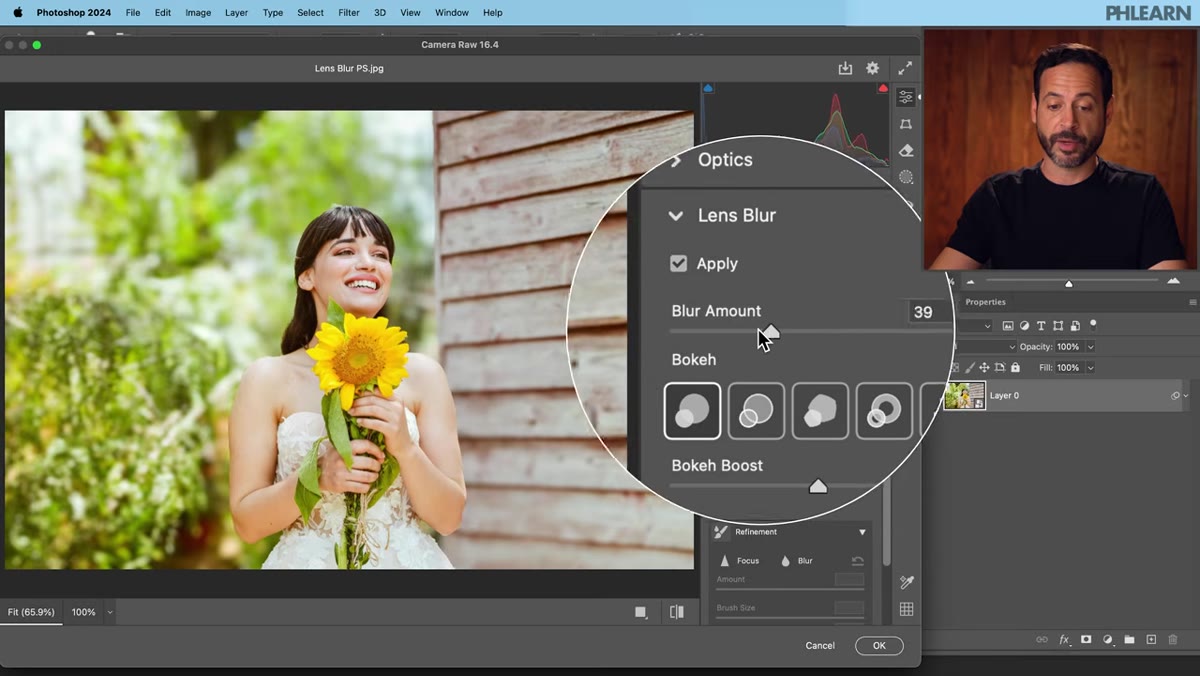 Blur Amount slider and bokeh shape options in Lens Blur panel
With your subject locked in, use the Blur Amount slider to control how soft the background gets. The panel also gives you bokeh shape options that simulate different aperture blade configurations. Some produce rounder highlights, others create a more angular quality. Neither is objectively better. It depends on the look of your original image and what feels natural.
Blur Amount slider and bokeh shape options in Lens Blur panel
With your subject locked in, use the Blur Amount slider to control how soft the background gets. The panel also gives you bokeh shape options that simulate different aperture blade configurations. Some produce rounder highlights, others create a more angular quality. Neither is objectively better. It depends on the look of your original image and what feels natural.
One thing Nace says that I’ll repeat because it’s genuinely the best advice in the whole tutorial: do not crank the blur all the way up. A heavy-handed blur looks fake immediately. Real lens blur is subtle, especially at portrait distances. Keep it in a range that makes the background recede without making it look like a cutout pasted onto mush. Boosting the highlights slider slightly can add a nice glow to out-of-focus light sources, but again, less is more.
Step 6: Refine the Focus Map with the Brush Tool
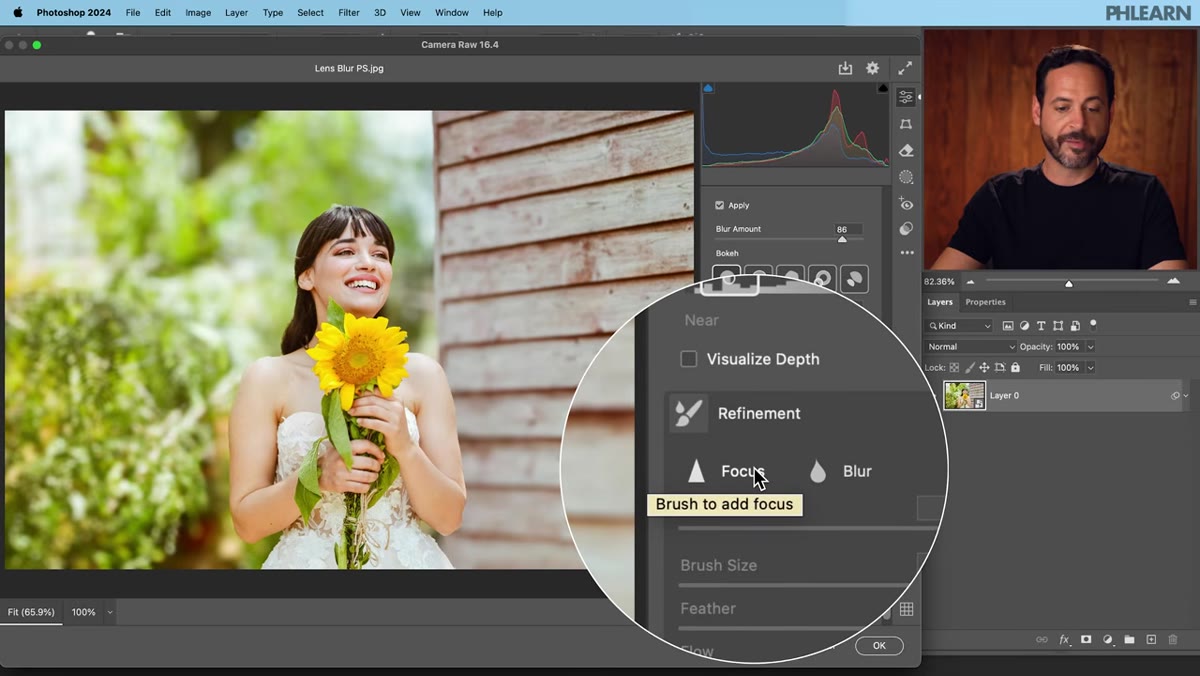 Painting refinements with Blur and In Focus brush options
Expand the Refinements section inside the Lens Blur panel. Here you get two brush modes: Blur and In Focus. These let you manually paint corrections onto the blur map. If part of your subject’s hair or clothing is getting blurred when it shouldn’t be, switch to In Focus and brush it back. If there’s a distracting element in the background that the AI didn’t catch, switch to Blur and paint over it.
Painting refinements with Blur and In Focus brush options
Expand the Refinements section inside the Lens Blur panel. Here you get two brush modes: Blur and In Focus. These let you manually paint corrections onto the blur map. If part of your subject’s hair or clothing is getting blurred when it shouldn’t be, switch to In Focus and brush it back. If there’s a distracting element in the background that the AI didn’t catch, switch to Blur and paint over it.
This is the step most tutorials rush through, but it’s where the real polish happens. Spend a few minutes here and your result will look significantly more intentional. Zoom in, work around edges carefully, and don’t be afraid to alternate between the two brush modes to get the boundary right.
Step 7: Apply and Check the Smart Filter
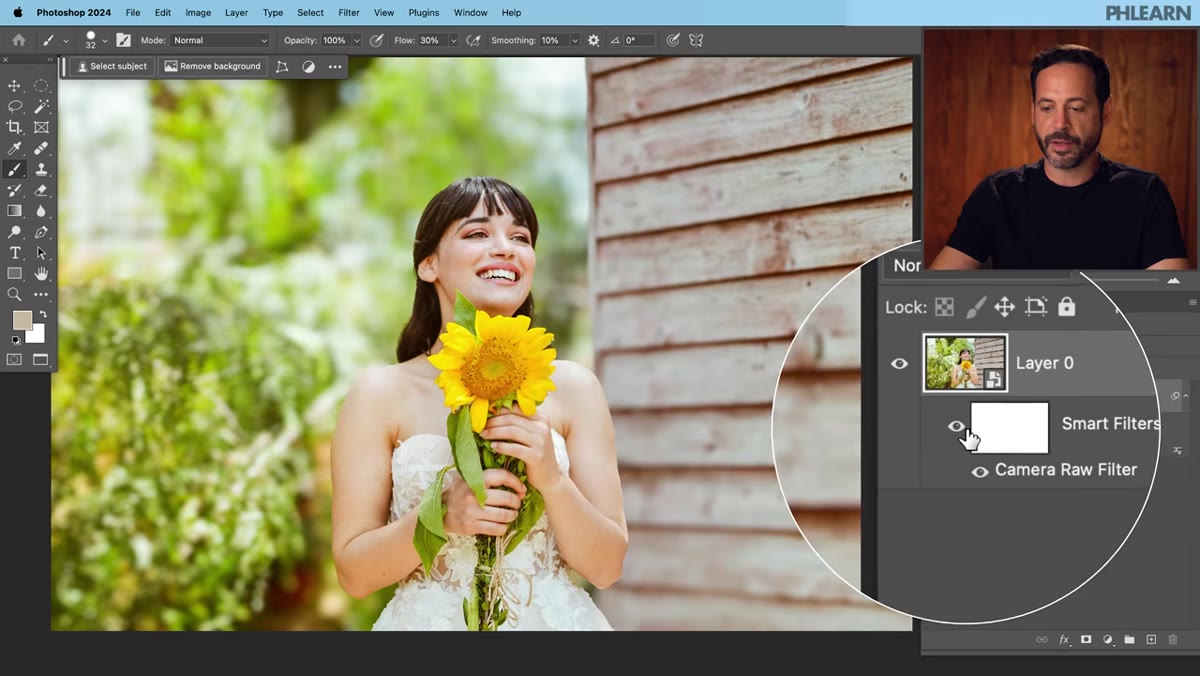 Smart Filter applied and visible in Layers panel
When you’re satisfied, click OK. Photoshop applies the Camera Raw Filter as a Smart Filter on your layer, visible in the Layers panel beneath the thumbnail. You can double-click it at any time to reopen the Camera Raw panel and adjust the settings. The layer mask attached to the Smart Filter is also editable, which gives you one more level of control if you need to limit where the blur shows up at all.
Smart Filter applied and visible in Layers panel
When you’re satisfied, click OK. Photoshop applies the Camera Raw Filter as a Smart Filter on your layer, visible in the Layers panel beneath the thumbnail. You can double-click it at any time to reopen the Camera Raw panel and adjust the settings. The layer mask attached to the Smart Filter is also editable, which gives you one more level of control if you need to limit where the blur shows up at all.
The non-destructive workflow here is the whole point. Because you started with a Smart Object, nothing you’ve done has permanently altered a single pixel.
My Take: This Won’t Replace a Fast Prime, But That’s Not the Point
I still think there’s no software substitute for optical blur when you’re shooting something critical, a paid portrait session, a product shot for a client who’s looking closely. But that’s a different conversation. What this tool actually solves is the “good enough to be frustrating” problem: the shot where everything is right except the background is just slightly too busy. That used to mean either a reshoot or living with it. Now it’s a ten-minute fix.
Where I’d push Nace’s tutorial further is in combining this with a manual luminosity or color selection to pre-isolate complex backgrounds before you even open Camera Raw. On high-contrast scenes, a little prep work in the main Photoshop workspace gives the lens blur algorithm cleaner data to work with and tighter results on edges.
The single most important thing to take away from this technique is the restraint principle. Believable blur is quiet. If someone looks at your photo and thinks “wow, nice bokeh,” the effect has already failed. They should just think the photo looks good. Keep the slider honest, use the refinement brush, and let the subject do the work.
Watch the full tutorial on YouTube to see Nace walk through each step on a real portrait, which makes the subtle slider adjustments much easier to calibrate when you’re learning the tool for the first time.
Comments (2)
I keep coming back to this article. It's that useful.
Printing this out and pinning it next to my monitor. That good.
Leave a Comment