Wide-angle lenses are some of the best value in photography. A fast, sharp wide-angle prime for a crop sensor camera can run you under $200, and the creative range you get is enormous. But there’s a catch: shoot a building with one and you’ll often come back with something that looks like the structure is either falling over or lunging at the viewer. I’ve run into this constantly, especially shooting street scenes and architecture for local editorial clients. The geometry goes sideways fast when you’re not perfectly level, and “fixing it later” sounds easy until you’re staring at a slanted mess in Lightroom with no clear starting point.
That’s exactly what Scott Kelby works through in this KelbyOne tutorial. He starts with a wide-angle shot taken in Venice, hand-held, not leveled, and demonstrably crooked. In about three minutes of screen time, he takes it from geometric disaster to clean, professional-looking architecture. The workflow he demonstrates hits three separate tools in Lightroom, and each one does something the others can’t. Watch the full tutorial on YouTube
Here’s how to follow along step by step.
Step 1: Open the Lens Corrections Panel and Enable Profile Correction
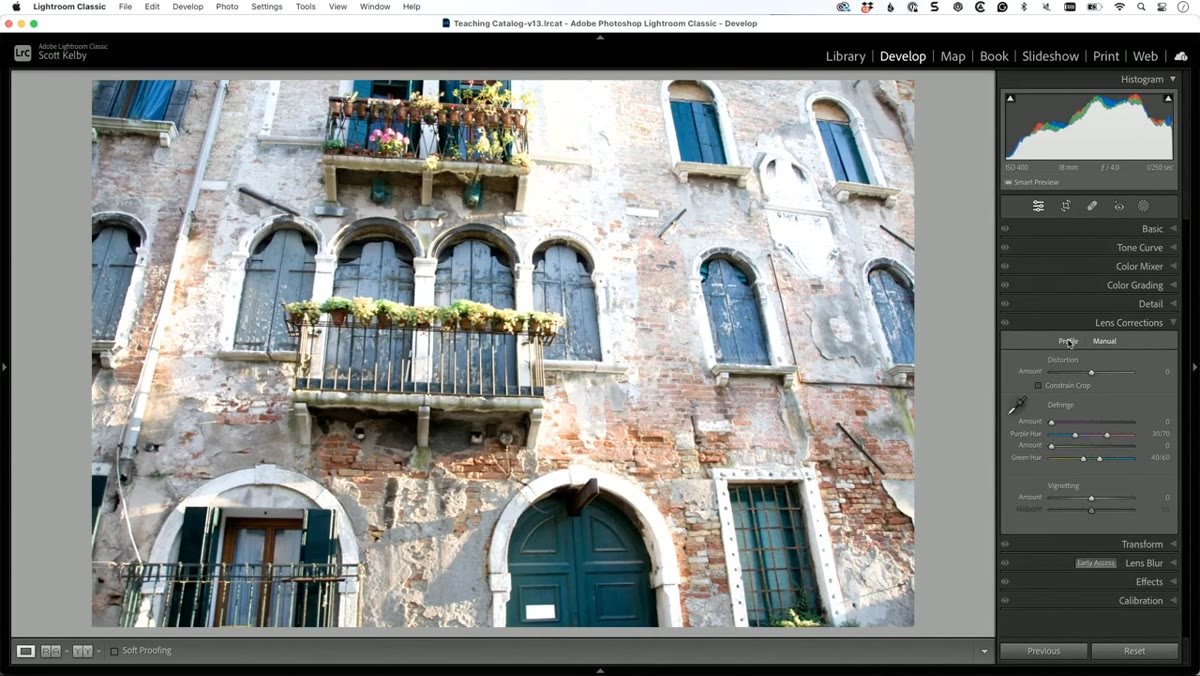 Lens Corrections panel open, Profile tab selected
In Lightroom’s Develop module, scroll down the right-hand panel to find “Lens Corrections.” Click the “Profile” tab inside that panel, then check the box that says “Enable Profile Corrections.” Lightroom will attempt to automatically detect your lens from the EXIF data embedded in the file and apply a correction profile built for that specific optic.
Lens Corrections panel open, Profile tab selected
In Lightroom’s Develop module, scroll down the right-hand panel to find “Lens Corrections.” Click the “Profile” tab inside that panel, then check the box that says “Enable Profile Corrections.” Lightroom will attempt to automatically detect your lens from the EXIF data embedded in the file and apply a correction profile built for that specific optic.
What this does is address barrel distortion, which is the bulging-outward effect you get with wide-angle lenses. It’s not a dramatic slider you’re pushing around manually. Lightroom reads the lens profile and applies a mathematically precise correction. On Kelby’s Venice shot, the building visibly stops bulging toward the viewer the moment the profile kicks in. If Lightroom can’t auto-detect your lens, you can manually select your camera manufacturer and lens model from the dropdown menus in the same panel.
Step 2: Fine-Tune Distortion Manually If Needed
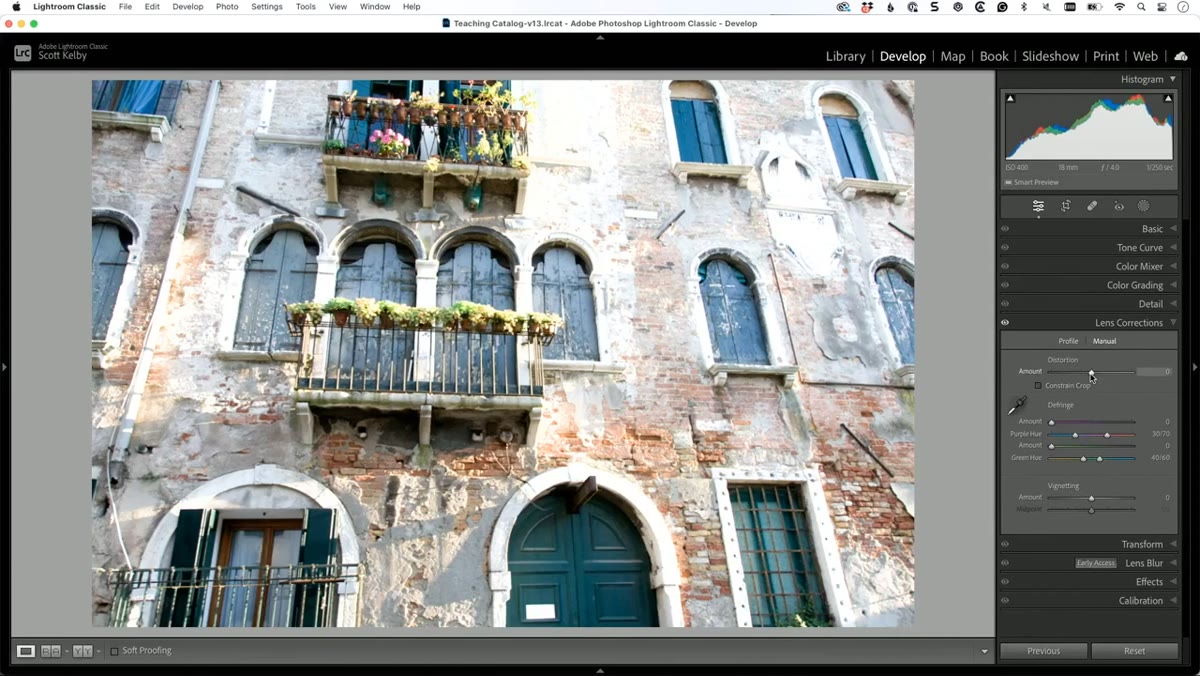 Manual tab showing Distortion slider in Lens Corrections
Sometimes the profile correction gets you most of the way there but not all the way. If you still see residual distortion, switch from the “Profile” tab to the “Manual” tab within the same Lens Corrections panel. You’ll see a “Distortion” slider. Dragging it right corrects barrel distortion further; dragging it left corrects pincushion distortion, which is the opposite problem where edges pinch inward.
Manual tab showing Distortion slider in Lens Corrections
Sometimes the profile correction gets you most of the way there but not all the way. If you still see residual distortion, switch from the “Profile” tab to the “Manual” tab within the same Lens Corrections panel. You’ll see a “Distortion” slider. Dragging it right corrects barrel distortion further; dragging it left corrects pincushion distortion, which is the opposite problem where edges pinch inward.
Kelby also points out the “Constrain Crop” checkbox in this tab. When you apply distortion corrections, the edges of your frame often show empty space where Lightroom had to warp the image. Enabling Constrain Crop automatically crops those transparent edges out, so you don’t have to go hunting for the Crop tool afterward. It’s a small thing, but it saves a step every single time.
Step 3: Navigate to the Transform Panel
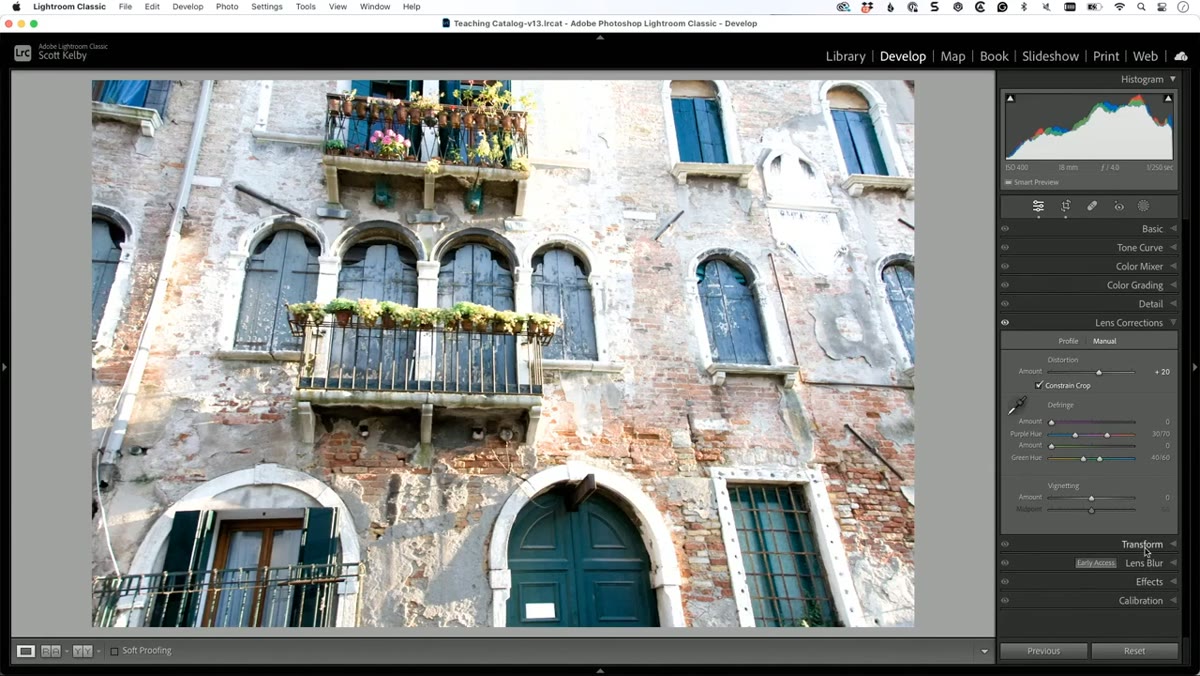 Transform panel visible in Develop module right panel
After lens corrections are applied, the image geometry is cleaner, but the building may still look like it’s leaning or tilting. This is a perspective problem, not a distortion problem, and it needs a different fix. Scroll down to the “Transform” panel in Lightroom’s Develop module. This is separate from Lens Corrections and handles keystoning and perspective shifts.
Transform panel visible in Develop module right panel
After lens corrections are applied, the image geometry is cleaner, but the building may still look like it’s leaning or tilting. This is a perspective problem, not a distortion problem, and it needs a different fix. Scroll down to the “Transform” panel in Lightroom’s Develop module. This is separate from Lens Corrections and handles keystoning and perspective shifts.
Lightroom gives you several automated options here, like “Auto,” “Vertical,” and “Full,” which attempt to straighten the image without any input from you. These work reasonably well on some images. On complex shots with multiple competing lines, they often overcorrect or produce strange results. That’s where the Guided transform comes in, and it’s the centerpiece of this whole workflow.
Step 4: Use Guided Transform to Tell Lightroom Which Lines Should Be Straight
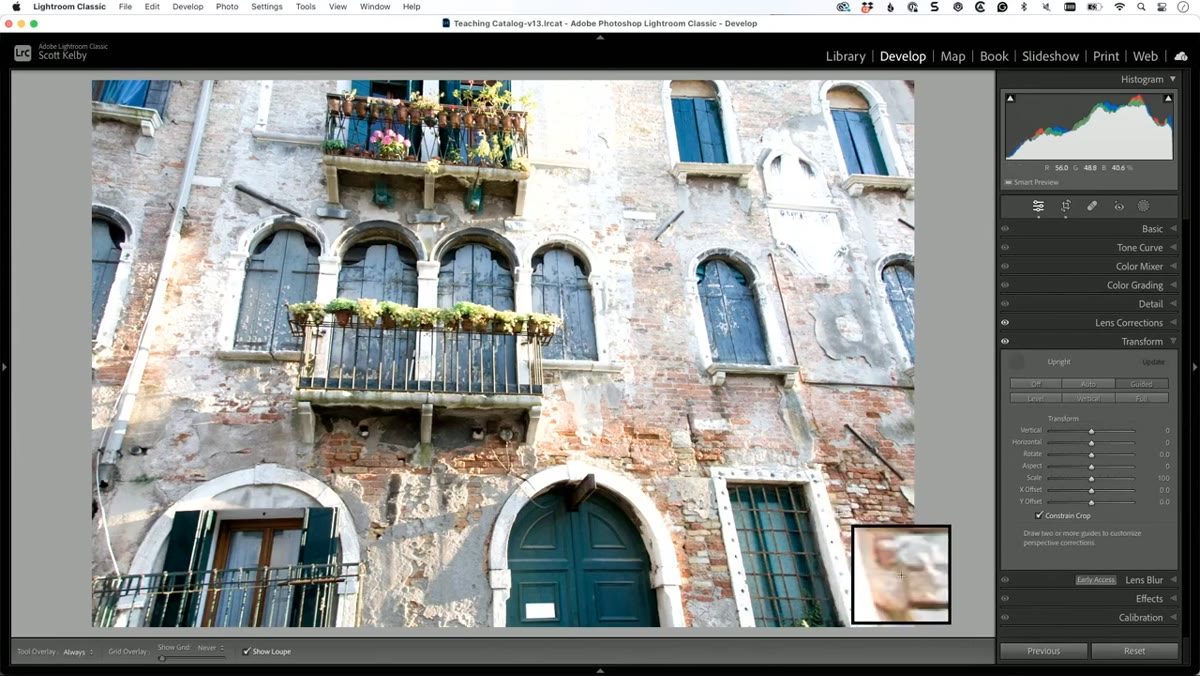 Guided transform active, first line being drawn on building edge
Click “Guided” in the Transform panel, or use the keyboard shortcut Shift+T to activate the Guided Upright tool. Your cursor turns into a crosshair. The idea is simple: you draw lines over parts of the image that you know should be perfectly vertical or horizontal, and Lightroom uses those as reference anchors to warp the entire image into alignment.
Guided transform active, first line being drawn on building edge
Click “Guided” in the Transform panel, or use the keyboard shortcut Shift+T to activate the Guided Upright tool. Your cursor turns into a crosshair. The idea is simple: you draw lines over parts of the image that you know should be perfectly vertical or horizontal, and Lightroom uses those as reference anchors to warp the entire image into alignment.
You need to draw four lines total, two vertical and two horizontal, for the tool to work properly. The image will look progressively worse as you draw the first two or three lines. That’s normal and expected. Lightroom is calculating the correction incrementally, and it doesn’t fully resolve until that fourth line is in place. Kelby draws his first two lines along vertical edges of the buildings in his Venice shot, then adds two horizontal lines along architectural features he knows are flat and level. The moment that fourth line is placed, the image snaps into a dramatically more convincing perspective. It’s honestly one of those Lightroom moments that feels a little magical the first time you see it.
Step 5: Adjust the Aspect Slider to Correct Any Stretching
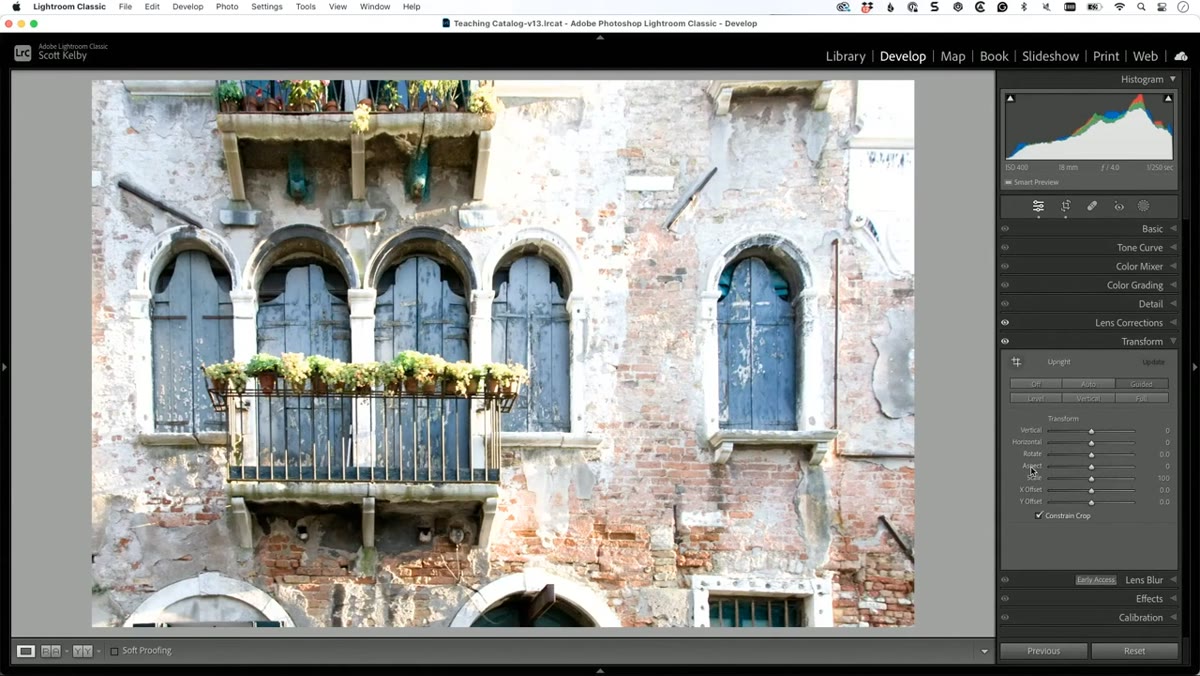 Aspect slider in Transform panel being dragged left
After a Guided transform, the image can sometimes look slightly tall and narrow, like it’s been vertically stretched. This happens because of how Lightroom warps the geometry to make those lines parallel. The fix is the “Aspect” slider inside the Transform panel, which you can access immediately after running the Guided correction.
Aspect slider in Transform panel being dragged left
After a Guided transform, the image can sometimes look slightly tall and narrow, like it’s been vertically stretched. This happens because of how Lightroom warps the geometry to make those lines parallel. The fix is the “Aspect” slider inside the Transform panel, which you can access immediately after running the Guided correction.
Dragging the Aspect slider left makes the image wider. Dragging it right makes it narrower. Kelby nudges his image slightly wider after the transform, and the proportion immediately looks more natural. There’s no magic number here. It depends on the specific correction and the original lens field of view. Make small adjustments and compare against the before view. A few ticks in either direction is usually all it takes.
What I’d Add From My Own Experience
The Guided transform tool is genuinely underused, and I think it’s because photographers don’t realize how bad it looks mid-process. If you draw two lines and the image looks insane, the instinct is to undo and try something else. Don’t. Commit to all four lines and then evaluate.
I’d also note that this workflow is especially useful for photographers shooting with budget wide-angle primes. Some of those lenses have significant barrel distortion baked in by design, because the manufacturer expects you to correct it in post. If Lightroom doesn’t have a built-in profile for a newer or less common lens, check whether the manufacturer offers a downloadable correction profile, or use the manual distortion slider to approximate it. I’ve tested enough cheap wide-angle lenses to know that even the distorted ones can produce clean results with two minutes of Lightroom work.
The single biggest takeaway from Kelby’s tutorial is that lens correction and perspective correction are two different problems requiring two different tools, and using both in sequence produces results that neither can achieve alone. If you’ve been relying on just the Auto Upright button and walking away disappointed, the Guided transform workflow is what you’ve been missing.
Watch the full tutorial on YouTube to see Scott Kelby walk through the entire process on the original Venice image.
Comments
Leave a Comment