Most of my readers know I’m not the guy who tells you to go buy more glass to solve a compositional problem. So when I came across this KelbyOne tutorial from photographer RC — Watch the full tutorial on YouTube — it immediately clicked with me. The core idea is dead simple: if your widest lens still can’t capture the full scope of a scene, shoot two overlapping frames and stitch them into a single super-wide panorama. No tilt-shift lens. No specialty pano head. Just technique.
RC shot this from inside the Burj Khalifa in Dubai, working with a Tamron 15-30mm f/2.8. Even at 15mm, the scene was too expansive for a single frame. So he swung the camera left and right, captured two shots, and stitched them in Photoshop. The result is something that looks like it required a lens most photographers don’t own. That’s the whole point. The workflow he walks through is repeatable with any wide-angle zoom, and if you’ve got Lightroom and Photoshop, you’ve already got everything you need.
This technique is especially useful for interior architecture, cityscapes at night, or any location where you physically cannot back up far enough to fit the scene in frame. I’ve run into this exact wall shooting Denver’s Union Station interior with a budget 14mm. Two shots would have saved me. Here’s exactly how RC does it.
Step 1: Capture Two Overlapping Wide-Angle Frames
 Photographer showing two wide frames shot at 15mm
Shoot your scene in two passes from the same position, pivoting left and right from a tripod. RC shot both frames at 15mm, with the camera on a tripod, at ISO 100, f/16, and an 8-second exposure. The key is overlap: you need roughly 30-40% of the frame to be shared between both shots so Photoshop has enough common data to align them. Don’t reposition the camera between shots, just rotate on the axis. A ball head with a panning lock makes this cleaner, but it’s not required.
Photographer showing two wide frames shot at 15mm
Shoot your scene in two passes from the same position, pivoting left and right from a tripod. RC shot both frames at 15mm, with the camera on a tripod, at ISO 100, f/16, and an 8-second exposure. The key is overlap: you need roughly 30-40% of the frame to be shared between both shots so Photoshop has enough common data to align them. Don’t reposition the camera between shots, just rotate on the axis. A ball head with a panning lock makes this cleaner, but it’s not required.
Keep your exposure settings identical between frames if the lighting is even across the scene. If one side is brighter than the other (which happened to RC, with one frame catching more ambient light), that’s fine. You’ll fix it in the next step.
Step 2: Match Exposures in Lightroom Before Merging
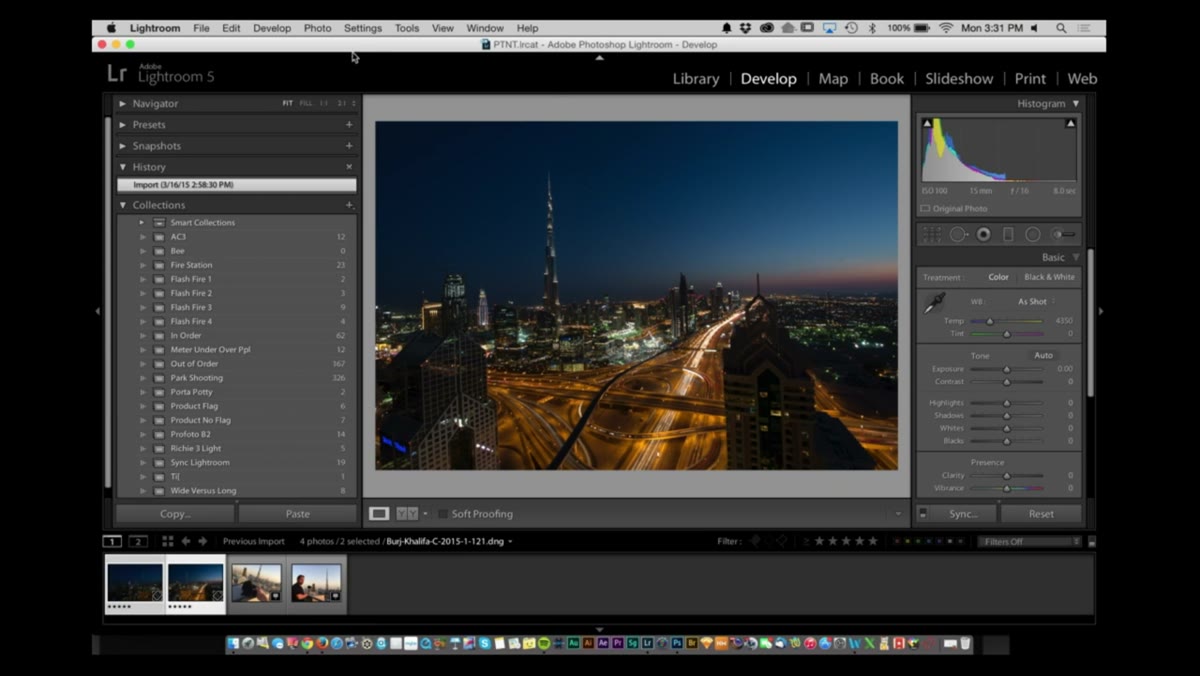 Lightroom with two images selected, Settings menu open
In Lightroom, select both images by shift-clicking them in the filmstrip. Then go to Settings and choose “Match Total Exposures.” This is a one-click tool that analyzes the tonal values of both frames and adjusts one to match the other. RC used it to bring his darker left-side frame in line with the brighter right-side frame before stitching.
Lightroom with two images selected, Settings menu open
In Lightroom, select both images by shift-clicking them in the filmstrip. Then go to Settings and choose “Match Total Exposures.” This is a one-click tool that analyzes the tonal values of both frames and adjusts one to match the other. RC used it to bring his darker left-side frame in line with the brighter right-side frame before stitching.
This step is easy to skip, but skipping it causes serious headaches during the merge. If the two frames have noticeably different brightness or white balance, Photoshop’s panorama blending engine will either create a visible seam or do awkward tonal gymnastics trying to reconcile them. A few seconds here saves a lot of masking later.
Step 3: Send Both Images to Photoshop as a Panorama Merge
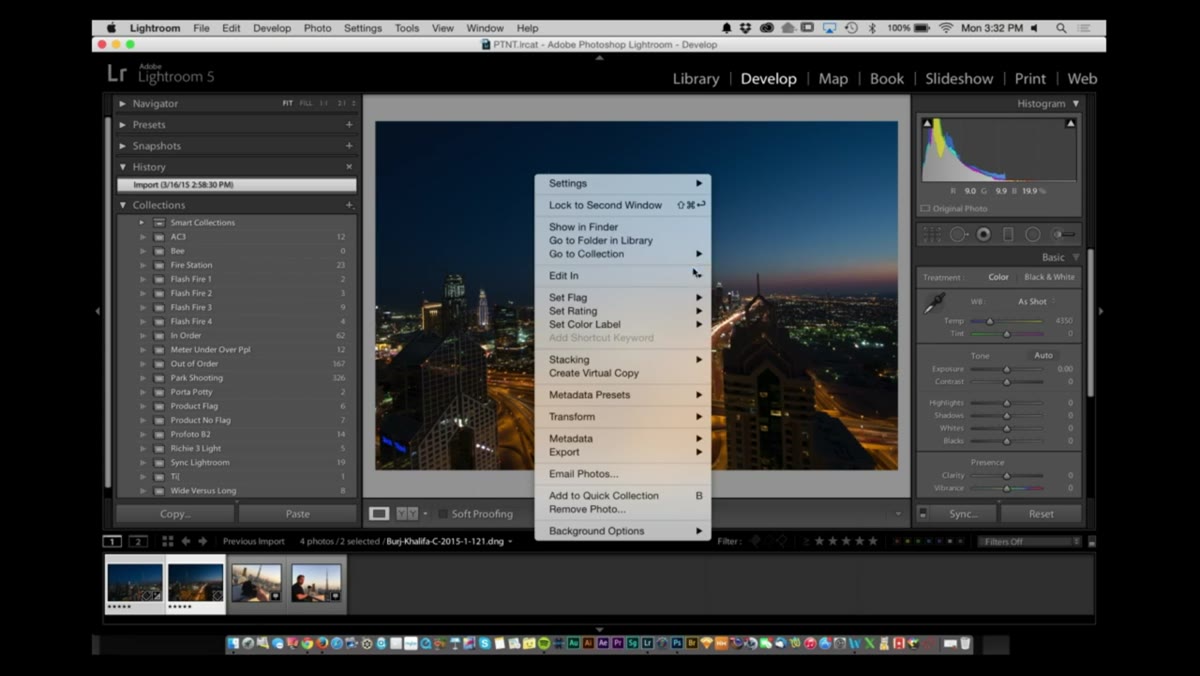 Right-click context menu in Lightroom showing “Edit In” option
With both images still selected in Lightroom, right-click and go to Edit In, then choose “Merge to Panorama in Photoshop.” This sends both files directly into Photoshop’s Photomerge dialog. Lightroom will export them as full-resolution files first, so expect a short wait depending on your file sizes. RC was working with DNG files, which are large, so the processing took a moment.
Right-click context menu in Lightroom showing “Edit In” option
With both images still selected in Lightroom, right-click and go to Edit In, then choose “Merge to Panorama in Photoshop.” This sends both files directly into Photoshop’s Photomerge dialog. Lightroom will export them as full-resolution files first, so expect a short wait depending on your file sizes. RC was working with DNG files, which are large, so the processing took a moment.
The important thing here is that you’re not manually placing layers. Photoshop handles the stacking automatically. You just need to make sure both images are selected before you trigger the export.
Step 4: Configure the Photomerge Settings
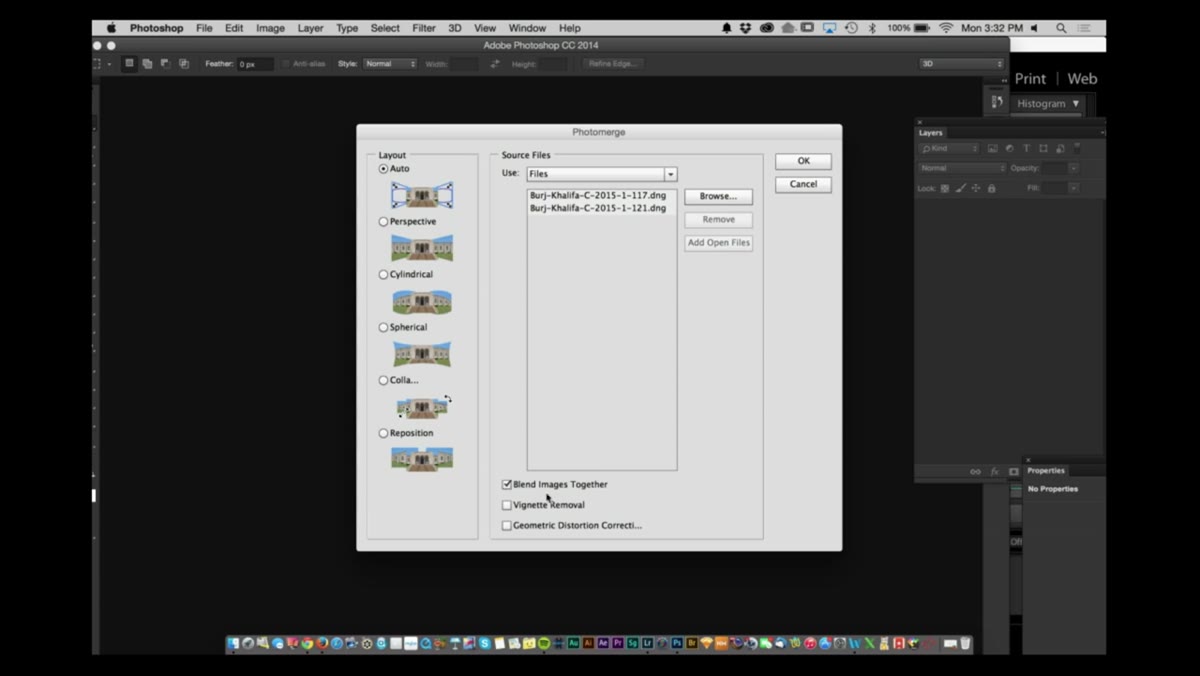 Photoshop Photomerge dialog with layout and options visible
Inside the Photomerge dialog, set the layout to Auto. Then check two options: Blend Images Together and Geometric Distortion Correction. The first option tells Photoshop to create smooth tonal transitions at the seam rather than a hard edge. The second option compensates for the barrel and pincushion distortion that wide-angle lenses introduce, which is significant at 15mm.
Photoshop Photomerge dialog with layout and options visible
Inside the Photomerge dialog, set the layout to Auto. Then check two options: Blend Images Together and Geometric Distortion Correction. The first option tells Photoshop to create smooth tonal transitions at the seam rather than a hard edge. The second option compensates for the barrel and pincushion distortion that wide-angle lenses introduce, which is significant at 15mm.
With these settings active, Photoshop will warp, rotate, and scale the two layers to align overlapping details, then blend them seamlessly. The resulting image may have a slightly curved or uneven border, which is normal for wide-angle stitching. RC wasn’t concerned about it, and you shouldn’t be either. That gets handled in the next step.
Step 5: Clean Up Edges with Content-Aware Fill or Puppet Warp
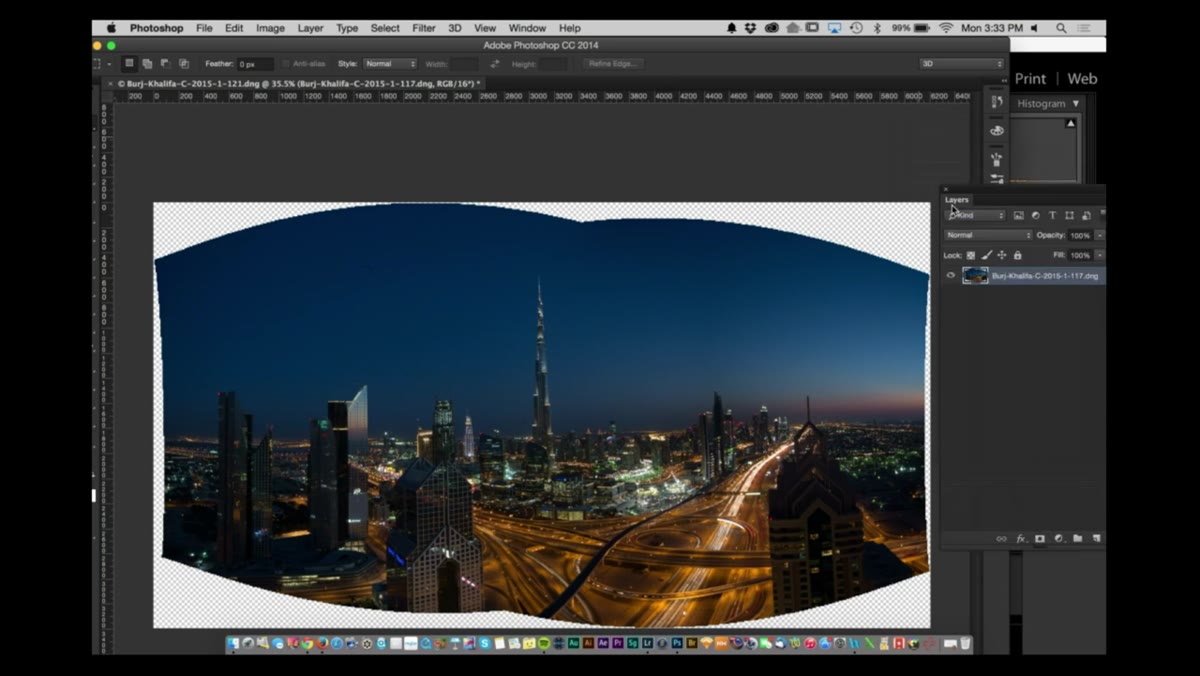
 Merged panorama in Photoshop with irregular transparent edges
After the merge completes, you’ll likely have transparent or ragged edges around the panorama, especially along the top and bottom where the warp distortion pulled the image inward. RC’s approach: use Content-Aware Fill to extend the canvas edges, or use Puppet Warp to nudge the image geometry into a more rectangular shape.
Merged panorama in Photoshop with irregular transparent edges
After the merge completes, you’ll likely have transparent or ragged edges around the panorama, especially along the top and bottom where the warp distortion pulled the image inward. RC’s approach: use Content-Aware Fill to extend the canvas edges, or use Puppet Warp to nudge the image geometry into a more rectangular shape.
For most shots, Content-Aware Fill is the faster path. Select the transparent areas with the Magic Wand, expand the selection by a few pixels, and run Edit, Fill, Content-Aware. Photoshop will synthesize texture to fill the gaps. It works surprisingly well on skies, architectural edges, and backgrounds. Puppet Warp gives you more control if the distortion is severe and the auto-fill looks wrong.
Step 6: Flatten and Finish
 Layers panel in Photoshop showing merged panorama layers
Once you’re happy with the edges, flatten the image and bring it back into Lightroom for final tone adjustments. Because you matched exposures before the merge, the global tones should already be close. From here it’s just standard post-processing: fine-tune contrast, shadows, highlights, and sharpening as you normally would.
Layers panel in Photoshop showing merged panorama layers
Once you’re happy with the edges, flatten the image and bring it back into Lightroom for final tone adjustments. Because you matched exposures before the merge, the global tones should already be close. From here it’s just standard post-processing: fine-tune contrast, shadows, highlights, and sharpening as you normally would.
RC’s final panorama from the Burj Khalifa interior is impressively wide without looking stretched or distorted, which is exactly what this method delivers when the overlap and merge settings are dialed in correctly.
What I’d Add: Shoot More Overlap Than You Think You Need
The one thing I’d build on from my own testing: err toward more overlap between your two frames, not less. I’ve stitched shots with 25% overlap and gotten away with it in flat scenes, but anything with architectural lines, people, or foreground objects in the middle distance needs closer to 40-50%. Photoshop needs identifiable matching points to calculate the warp correctly, and at 15mm the perspective shift between two adjacent frames is more dramatic than you’d expect. When overlap is thin, the alignment math gets sloppy and the seam becomes visible even after blending.
If you’re shooting handheld instead of from a tripod, bump that overlap even higher and shoot a few extra frames as insurance. The stitch algorithm is forgiving, but only up to a point.
The biggest takeaway from this tutorial is that super-wide coverage is a technique problem before it’s a gear problem. Two frames at 15mm stitched together gives you a field of view that no standard zoom can match, at zero additional cost. RC’s workflow in Lightroom and Photoshop is efficient, the settings are specific enough to follow exactly, and the results speak for themselves.
Watch the full tutorial on YouTube to see RC walk through the Burj Khalifa shoot and the complete Photoshop merge in real time.
Comments
Leave a Comment