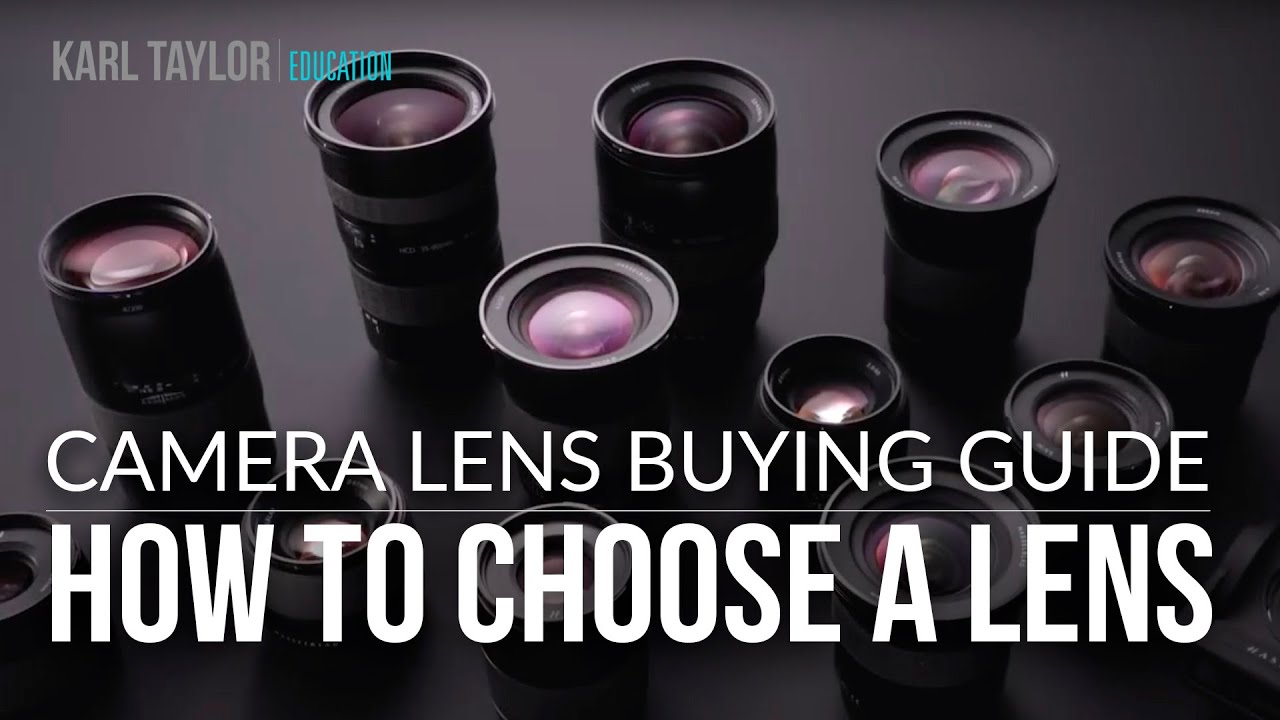
I’ll be honest with you: the question I get asked more than any other is not “which camera should I buy?” It’s “which lens should I buy?” And that makes sense, because camera bodies come and go but a good lens can follow you for decades. The problem is that lens marketing is dense, the jargon is thick, and the price range runs from $80 to $14,000 on the same camera mount. Most buyers freeze up and either overspend on something they don’t need or grab a kit lens and wonder why their photos look flat six months later.
That’s exactly why I kept coming back to this Visual Education tutorial on choosing a camera lens. Watch the full tutorial on YouTube. It doesn’t push you toward a specific product or brand. It walks through the actual decision-making framework: what lens types exist, what focal lengths do, and how to match both to the kind of shooting you actually do. I’m going to expand on that walkthrough here with some extra context from my own time testing budget glass across almost every category covered.
Step 1: Understand What a Lens Actually Does
 Narrator explaining what a camera lens is
Before you can pick the right lens, you need a clear mental model of what a lens is doing. A lens is a shaped piece of optical glass that gathers and bends light onto your camera sensor. The specific way it’s shaped determines how much of a scene you capture, how sharp the image is, and how much light reaches the sensor at a given moment.
Narrator explaining what a camera lens is
Before you can pick the right lens, you need a clear mental model of what a lens is doing. A lens is a shaped piece of optical glass that gathers and bends light onto your camera sensor. The specific way it’s shaped determines how much of a scene you capture, how sharp the image is, and how much light reaches the sensor at a given moment.
This matters practically because not all lenses are built equally. Two lenses might share a focal length but produce completely different results in sharpness, color rendering, and low-light performance. Knowing this upfront stops you from shopping purely by number.
Step 2: Decide Between a Prime Lens and a Zoom Lens
 Split comparison of prime lens and zoom lens on screen
This is the first real fork in the road. A prime lens has a single fixed focal length. A zoom lens covers a range. The tutorial is clear that neither is universally better. They serve different priorities.
Split comparison of prime lens and zoom lens on screen
This is the first real fork in the road. A prime lens has a single fixed focal length. A zoom lens covers a range. The tutorial is clear that neither is universally better. They serve different priorities.
Prime lenses tend to be sharper, lighter, cheaper, and capable of wider maximum apertures. That last point is huge for low-light shooting or getting that blurred background look without editing. The trade-off is that you physically move to reframe your shot instead of twisting a ring. Zoom lenses give you that range flexibility in a single piece of glass, which is a real advantage if you’re covering a lot of ground fast, like at an event or on a travel day. The downside is that most zoom lenses in the budget tier give up some sharpness and nearly always offer a narrower maximum aperture compared to primes at a similar price. There’s no free lunch.
Step 3: Weigh the Real Cost of Each Option
 Narrator discussing prime lens advantages including size and cost
Here’s something the tutorial touches on that I want to underline: buying multiple prime lenses to cover a full range can get expensive and heavy fast. A 35mm, a 50mm, and an 85mm might each outperform a single zoom in image quality, but you’re now carrying three lenses, three caps, and three filters. And you’ve probably spent more than a good zoom would have cost.
Narrator discussing prime lens advantages including size and cost
Here’s something the tutorial touches on that I want to underline: buying multiple prime lenses to cover a full range can get expensive and heavy fast. A 35mm, a 50mm, and an 85mm might each outperform a single zoom in image quality, but you’re now carrying three lenses, three caps, and three filters. And you’ve probably spent more than a good zoom would have cost.
On the flip side, chasing a high-quality zoom that holds its aperture across the full range (what the industry calls a “constant aperture” zoom) is going to cost you significantly more than a budget variable-aperture zoom. The sweet spot for most shooters I talk to: one fast prime in the focal length they shoot most, paired with a versatile zoom for everything else. It’s a hybrid approach that keeps your bag light and your shots consistent.
Step 4: Learn the Focal Length Categories
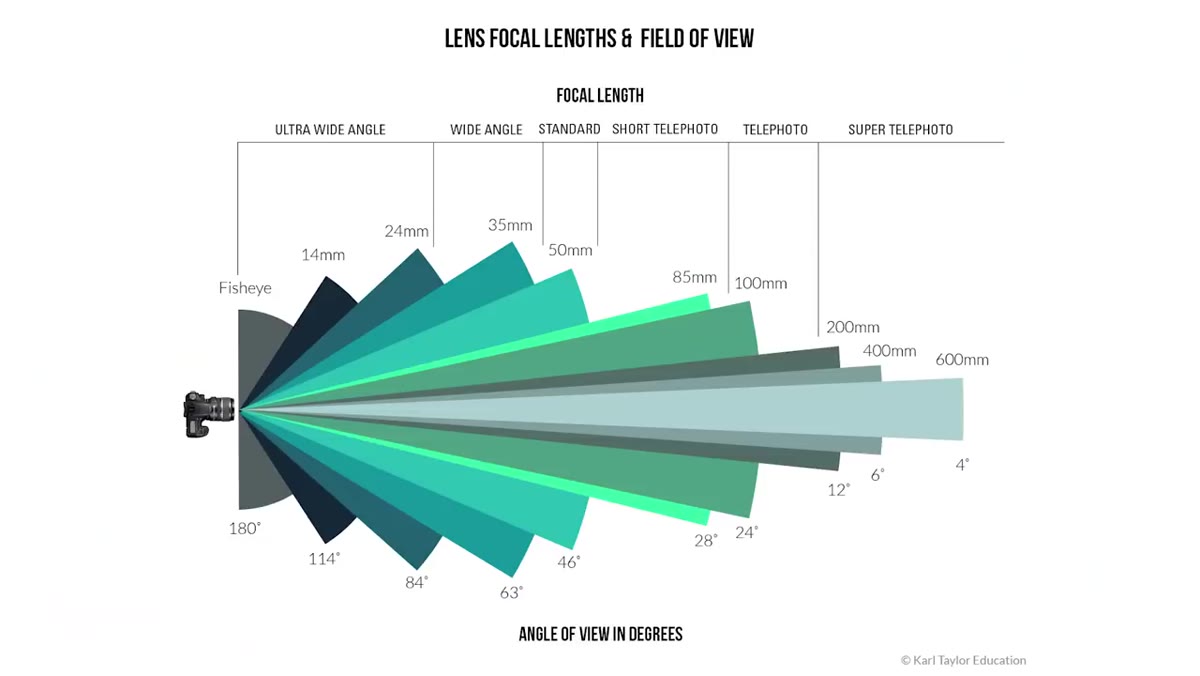 Graphic showing focal length categories from fisheye to super telephoto
The tutorial runs through a focal length spectrum that’s worth knowing cold. Here’s how to think about each category in practical terms.
Graphic showing focal length categories from fisheye to super telephoto
The tutorial runs through a focal length spectrum that’s worth knowing cold. Here’s how to think about each category in practical terms.
Fisheye lenses sit at the extreme wide end and capture a full 180-degree field of view with heavy barrel distortion. They’re specialty tools, not everyday lenses. Ultra-wide glass, roughly 14mm to 24mm, captures dramatic wide scenes with minimal distortion and works well for architecture or landscape. Wide-angle lenses from 24mm to 35mm are versatile and popular for street photography because they feel natural without the exaggeration of a fisheye.
Step 5: Match Focal Length to Your Subject
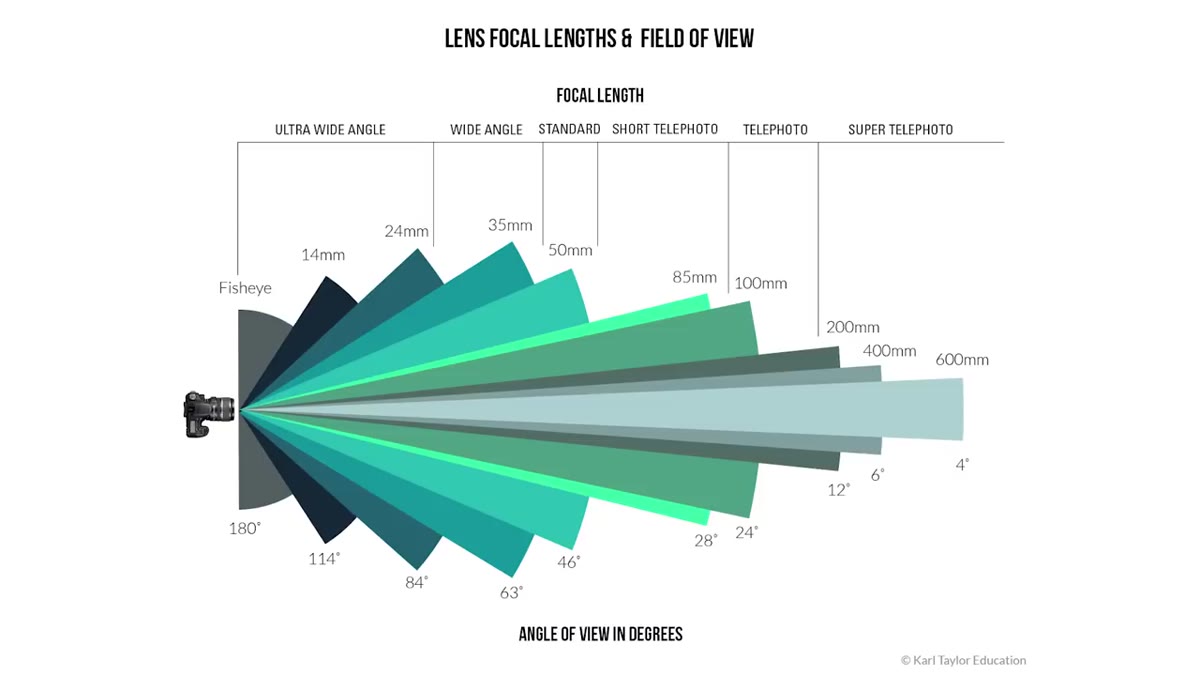 Narrator explaining standard and short telephoto focal lengths
Standard lenses sit around 50mm and replicate roughly what the human eye sees. They’re a great starting point for any shooter. Short telephotos, from 85mm to around 100mm, are the portrait photographer’s territory. The 85mm in particular compresses perspective in a way that’s flattering to faces, which is why it shows up constantly in portrait kits. Moving into telephoto range, 135mm to 250mm, you’re looking at sports, wildlife, and events where you can’t physically get close to your subject. And super telephoto, 250mm and beyond all the way to 600mm, is for serious wildlife and sports work where distance is non-negotiable.
Narrator explaining standard and short telephoto focal lengths
Standard lenses sit around 50mm and replicate roughly what the human eye sees. They’re a great starting point for any shooter. Short telephotos, from 85mm to around 100mm, are the portrait photographer’s territory. The 85mm in particular compresses perspective in a way that’s flattering to faces, which is why it shows up constantly in portrait kits. Moving into telephoto range, 135mm to 250mm, you’re looking at sports, wildlife, and events where you can’t physically get close to your subject. And super telephoto, 250mm and beyond all the way to 600mm, is for serious wildlife and sports work where distance is non-negotiable.
The honest advice here: figure out what you shoot most, find the focal length that serves that subject, and start there. Don’t buy a 400mm because it looks impressive if you mostly photograph friends at dinner.
Step 6: Factor in Aperture Before You Finalize
 Narrator comparing aperture capability between prime and zoom lenses
The tutorial doesn’t go deep on aperture numbers, but it does flag that prime lenses offer wider apertures than zoom lenses. I want to give you the practical version. Aperture is expressed as an f-number. Lower numbers mean a wider opening, more light, and more background blur. A lens that opens to f/1.8 lets in significantly more light than one that maxes out at f/4.
Narrator comparing aperture capability between prime and zoom lenses
The tutorial doesn’t go deep on aperture numbers, but it does flag that prime lenses offer wider apertures than zoom lenses. I want to give you the practical version. Aperture is expressed as an f-number. Lower numbers mean a wider opening, more light, and more background blur. A lens that opens to f/1.8 lets in significantly more light than one that maxes out at f/4.
For indoor shooting, low-light events, or any situation where you want subject separation from the background, aperture matters as much as focal length. A 50mm f/1.8 prime is often the first lens I recommend to anyone building a kit on a tight budget because it delivers wide aperture performance at a price that’s almost embarrassingly low relative to what you get.
What I’d Add From My Own Testing
The tutorial gives you the framework but doesn’t get into one thing I’ve seen trip up beginners constantly: sensor size affects how focal lengths feel. A 50mm lens on a crop sensor camera behaves more like an 80mm lens. This means if you’re shooting on an entry-level DSLR or mirrorless with a crop sensor, your “nifty fifty” is actually landing closer to short telephoto territory. It won’t feel wide at all. If you want that natural, walk-around field of view on a crop sensor body, look at something in the 28mm to 35mm range instead.
I’ve tested enough budget lenses to have a pretty long spreadsheet at this point, and the crop factor mistake is one I made myself early on. It’s a simple thing to account for once you know about it, but it can make a $100 lens purchase feel wrong for reasons that have nothing to do with the lens itself.
The single most useful thing you can take from this guide is this: define your subject first, match the focal length to it, then decide whether a prime or zoom serves your shooting style. Everything else, sharpness, aperture, size, price, flows from those two decisions.
Watch the full tutorial on YouTube for the full visual breakdown, including the focal length comparison graphic that makes the spectrum much easier to picture.
Comments (5)
The before and after really sells it. Incredible difference.
This is the kind of content that keeps me coming back.
This is going in my reference folder. Incredibly useful.
Shared this with my photography group. Everyone loved it.
Love this. I referenced a similar technique in one of my recent posts. Always good to see other perspectives.
Leave a Comment