I used to think my budget lenses were the problem. I’d pixel-peep a shot, see soft corners or muddy detail, and immediately start shopping for something more expensive. Then I started actually learning how optics work, and I realized I’d been fighting my own gear by shooting at the wrong apertures. A lot of photographers, even experienced ones, skip this foundational knowledge because it feels too technical. It isn’t. Once it clicks, it changes how you make every exposure decision.
In this Joel Grimes tutorial, Watch the full tutorial on YouTube, he breaks down the concept of a lens’s “sweet spot” with a clarity I haven’t seen elsewhere. This isn’t about buying better glass. It’s about understanding the physics already baked into whatever lens you’re holding right now.
The core idea is this: every lens performs differently depending on what aperture you’re using, and the sharpest aperture sits in the middle of the range, not at either extreme. Two optical phenomena pull image quality in opposite directions from that center point. Learn what they are and you’ll stop second-guessing your gear.
Step 1: Understand Why Shooting Wide Open Causes Aberration
 Diagram showing light rays bending through curved lens elements
When you shoot at your lens’s maximum aperture, say f/1.4 or f/2.8, light passes through the full diameter of the glass elements inside the barrel. Those elements are curved, and the edges of each curve bend light at a slightly different angle than the center does. The result is that light rays don’t all converge at exactly the same point on your sensor. That misalignment is called aberration, and it shows up as softness, color fringing, or blurry corners.
Diagram showing light rays bending through curved lens elements
When you shoot at your lens’s maximum aperture, say f/1.4 or f/2.8, light passes through the full diameter of the glass elements inside the barrel. Those elements are curved, and the edges of each curve bend light at a slightly different angle than the center does. The result is that light rays don’t all converge at exactly the same point on your sensor. That misalignment is called aberration, and it shows up as softness, color fringing, or blurry corners.
Zoom lenses compound this problem because they contain more glass elements than prime lenses. More elements means more surfaces for light to misfocus as it travels through. Early zooms were genuinely bad for this reason. Modern coatings and computer-assisted optical design have reduced it significantly, but aberration is never fully eliminated. It exists in every lens ever made, and it peaks at wide-open apertures.
Step 2: Recognize When Wide Open Is Still Acceptable
 Portrait framing with subject centered in the frame
Aberration hits the edges and corners of your frame hardest. The center of the image tends to hold up better because the light passing through the middle of the lens travels through the least-curved portion of the glass. Grimes points out that this is exactly why shooting wide open for portraits can still work reasonably well. Your subject’s face sits near the center of the frame, and the soft corners are either blurred background or empty space anyway.
Portrait framing with subject centered in the frame
Aberration hits the edges and corners of your frame hardest. The center of the image tends to hold up better because the light passing through the middle of the lens travels through the least-curved portion of the glass. Grimes points out that this is exactly why shooting wide open for portraits can still work reasonably well. Your subject’s face sits near the center of the frame, and the soft corners are either blurred background or empty space anyway.
The practical takeaway here: if you need a wide aperture for shallow depth of field, position your critical subject at or near the center of the frame. Don’t expect clean, sharp corners at f/1.8 on most lenses, and don’t penalize your lens for a weakness that physics guarantees it will have.
Step 3: Learn What Diffraction Is and Why Stopping Down Too Far Hurts Sharpness
 Aperture scale showing f/22 and f/32 marked
Here’s where a lot of photographers get tripped up. They know wide-open is soft, so they assume the solution is to stop down as far as possible. Shoot at f/22 for maximum sharpness, right? Wrong. At very small apertures, a different problem kicks in: diffraction.
Aperture scale showing f/22 and f/32 marked
Here’s where a lot of photographers get tripped up. They know wide-open is soft, so they assume the solution is to stop down as far as possible. Shoot at f/22 for maximum sharpness, right? Wrong. At very small apertures, a different problem kicks in: diffraction.
Diffraction happens when the aperture opening becomes so small that light waves start bending around its edges rather than traveling straight through. Instead of clean, focused rays hitting your sensor, you get a slight spreading of the light that degrades overall sharpness across the entire frame. Unlike aberration, which punishes the corners, diffraction is a whole-image problem. You can stop a lens down past the point of usefulness, and many photographers do exactly this when they’re trying to maximize depth of field.
Step 4: Find the Aperture Range Where Both Problems Are Minimized
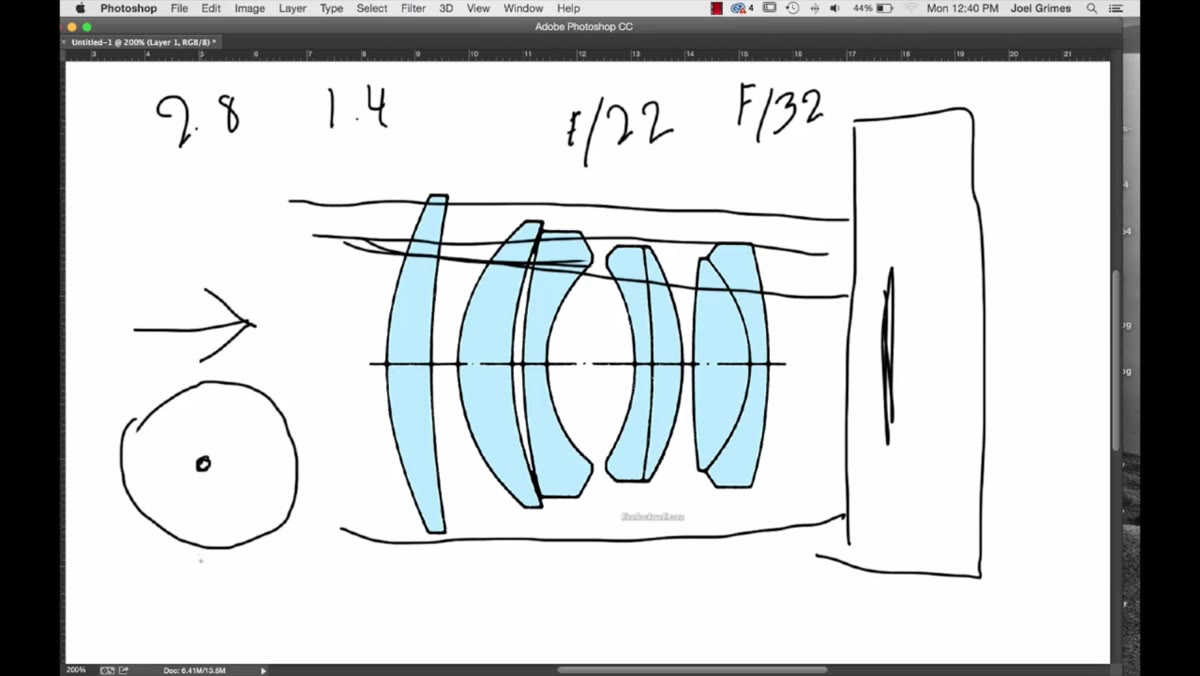 Aperture range illustrated with sweet spot highlighted in the middle
The sweet spot of any lens is the aperture range where aberration from wide-open shooting has been reduced enough to matter, but diffraction from stopping down hasn’t yet set in. For most lenses, this range sits somewhere between two and three stops from wide open. On an f/2.8 lens, that usually means somewhere around f/5.6 to f/8. On an f/1.4 lens, you’re often looking at f/4 to f/5.6.
Aperture range illustrated with sweet spot highlighted in the middle
The sweet spot of any lens is the aperture range where aberration from wide-open shooting has been reduced enough to matter, but diffraction from stopping down hasn’t yet set in. For most lenses, this range sits somewhere between two and three stops from wide open. On an f/2.8 lens, that usually means somewhere around f/5.6 to f/8. On an f/1.4 lens, you’re often looking at f/4 to f/5.6.
This isn’t a fixed rule. Some lenses are sharper at f/4 than f/8, and others peak at f/8. The only way to know for certain is to test your specific lens on a tripod with a static subject and compare crops at each aperture stop. It takes about twenty minutes and tells you more than any spec sheet will.
Step 5: Use a Stable Platform So Aperture Is the Only Variable
 Camera mounted on tripod in shooting position
Grimes is insistent about this, and I agree completely. Camera shake and lens optics are two separate problems, but they produce similar-looking results: soft images. If you’re trying to evaluate your lens’s performance at different apertures without a tripod, you’re just adding noise to the test. You can’t isolate one variable while another one is flopping around.
Camera mounted on tripod in shooting position
Grimes is insistent about this, and I agree completely. Camera shake and lens optics are two separate problems, but they produce similar-looking results: soft images. If you’re trying to evaluate your lens’s performance at different apertures without a tripod, you’re just adding noise to the test. You can’t isolate one variable while another one is flopping around.
Use a tripod, trigger your shutter with a timer or remote release, and shoot the same static subject at every aperture stop from wide open to f/22. Then zoom into 100 percent crops in your editing software and compare. This is the only test that matters, and it costs nothing.
What I’d Add From My Own Testing
I’ve run this test on probably two dozen lenses at this point, most of them under $200. What surprises photographers every time is how close budget glass gets to premium glass once you’re shooting at the sweet spot. Wide open, a $150 lens and a $600 lens can look very different. At f/8 on a tripod, that gap closes in ways that would make most people uncomfortable if they thought about how much money they’d spent.
The bigger lesson from all my testing: most sharpness problems aren’t gear problems. They’re aperture problems, or they’re camera shake problems. Fix those first before you spend another dollar on glass. My spreadsheet of tested lenses keeps growing and the conclusion keeps being the same: shoot at the right aperture, stabilize your camera, and most “bad” lenses become perfectly good ones.
The single most important thing to take away from this tutorial is that your lens has a performance curve, and you’re in control of where you operate on it. Stop shooting every scene at wide open because it’s your lens’s maximum capability, and stop stopping down to f/22 because you want everything in focus. Find the middle ground for your specific glass and use that as your default for any shot where sharpness is the priority.
Watch the full tutorial on YouTube to see Joel Grimes walk through the optical diagrams himself. The visual explanation of how light bends through curved glass elements is worth watching even if you already understand the concept.
Comments
Leave a Comment