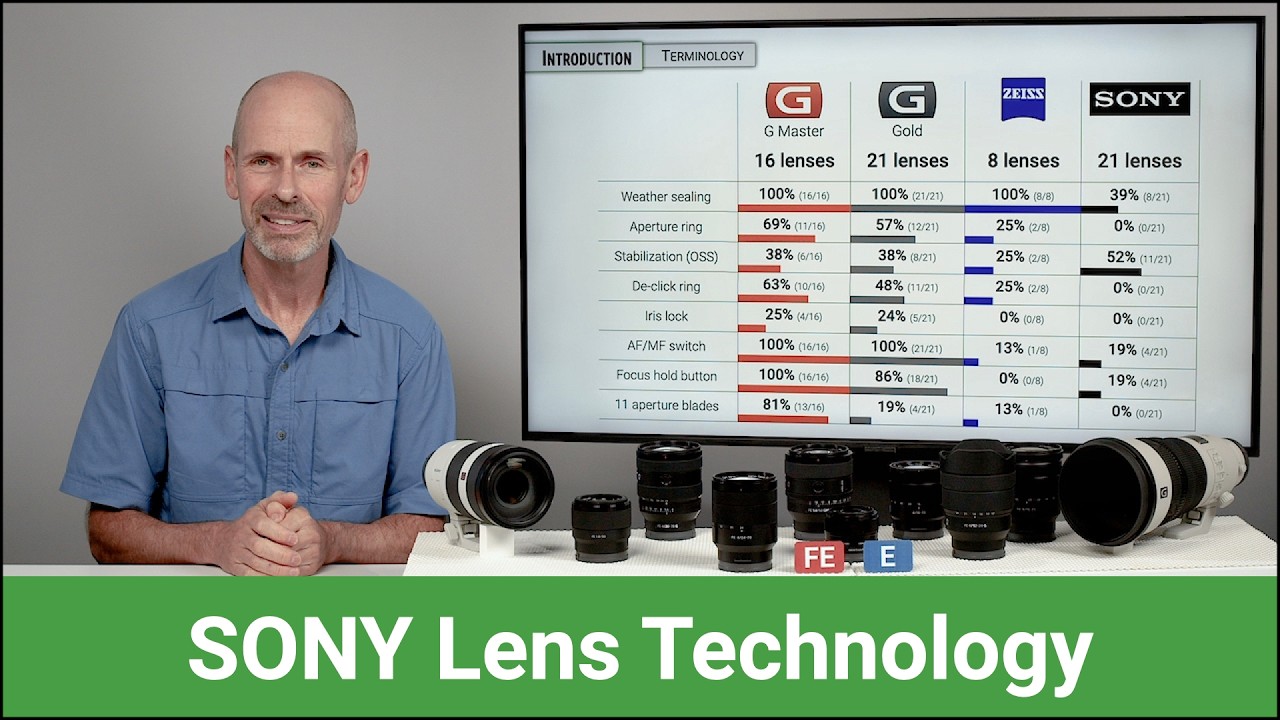
When I first started seriously shopping Sony glass, I did what most people do: I filtered by price, squinted at sample images, and then got completely lost in the alphabet soup printed on the barrel. FE. G. GM. Zeiss T*. I had no idea which letters actually mattered for my shooting and which ones were just Sony marketing their way into my wallet. Every forum thread I found either assumed I already knew or dissolved into brand wars. I needed someone to just walk me through it plainly.
That’s exactly what John Greengo does in this tutorial. Watch the full tutorial on YouTube – it’s one of those videos I wish had existed when I was building my first kit. He covers the entire Sony Alpha lens ecosystem, from mount types to quality tiers to every optical acronym you’ll encounter on a product page. What follows is my breakdown of his walkthrough, organized so you can use it as a reference the next time you’re staring at a lens listing and wondering if that extra letter is worth an extra $400.
Step 1: Understand the Two Mount Types First
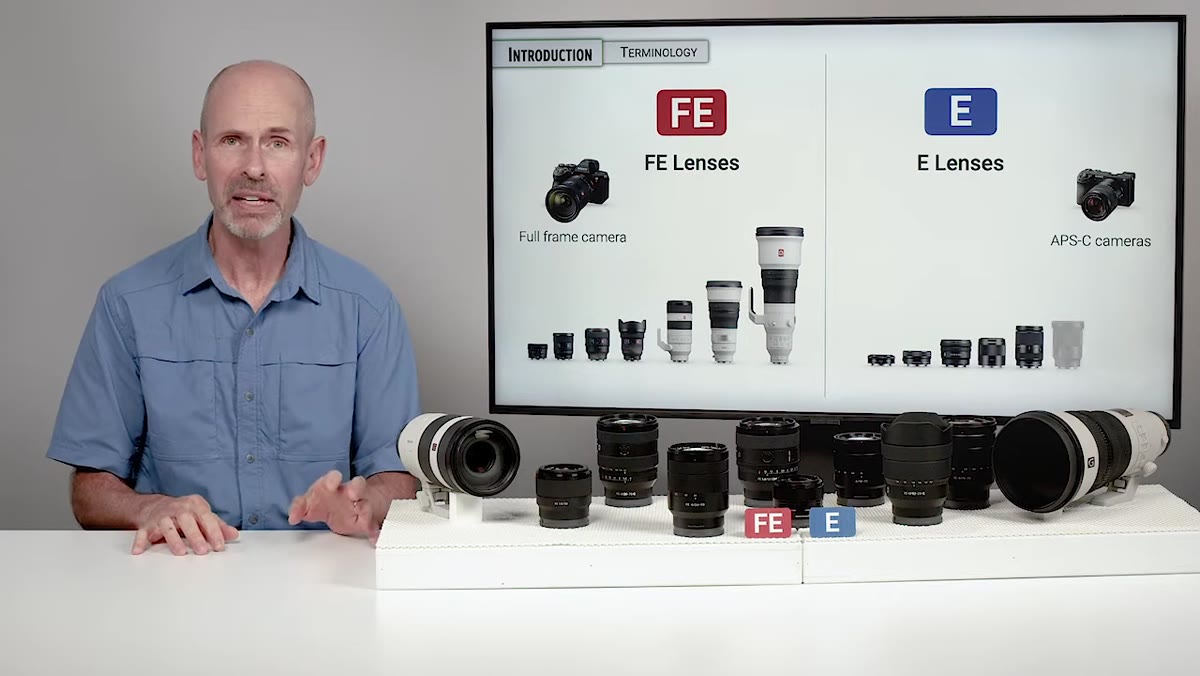 FE and E lens categories shown with red and blue logos
Before any optical feature matters, you need to know which lenses physically fit your camera and which ones make sense for your sensor. Sony’s E-mount system covers two categories: FE lenses, designed for full-frame sensors, and E-series lenses, designed for APS-C crop-sensor cameras. The critical thing Greengo points out is that the relationship only works one direction. If you shoot crop-sensor, you can mount FE lenses without any issue – they just cover more sensor area than you need, which is fine. But E-series lenses on a full-frame body will vignette badly or trigger automatic crop mode. So if you’re on a budget APS-C body now but planning to move to full-frame later, buying FE glass from the start is actually the smarter long-term investment.
FE and E lens categories shown with red and blue logos
Before any optical feature matters, you need to know which lenses physically fit your camera and which ones make sense for your sensor. Sony’s E-mount system covers two categories: FE lenses, designed for full-frame sensors, and E-series lenses, designed for APS-C crop-sensor cameras. The critical thing Greengo points out is that the relationship only works one direction. If you shoot crop-sensor, you can mount FE lenses without any issue – they just cover more sensor area than you need, which is fine. But E-series lenses on a full-frame body will vignette badly or trigger automatic crop mode. So if you’re on a budget APS-C body now but planning to move to full-frame later, buying FE glass from the start is actually the smarter long-term investment.
Step 2: Learn Sony’s Four Quality Tiers
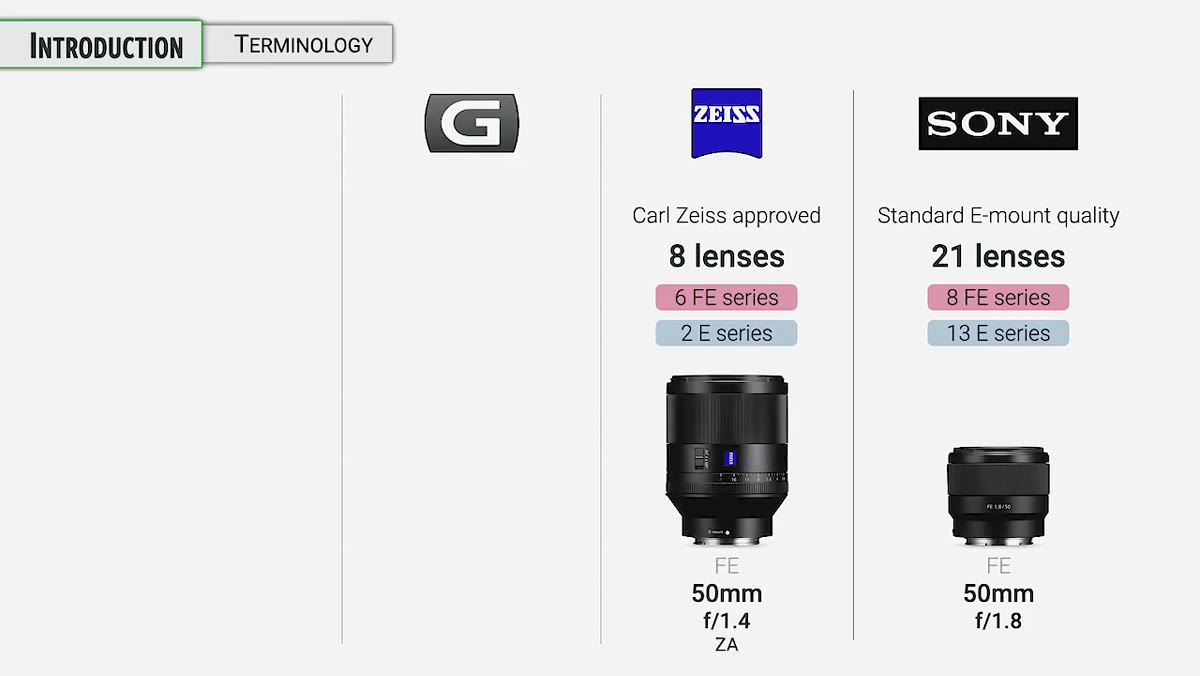 Sony lens series categories listed on screen
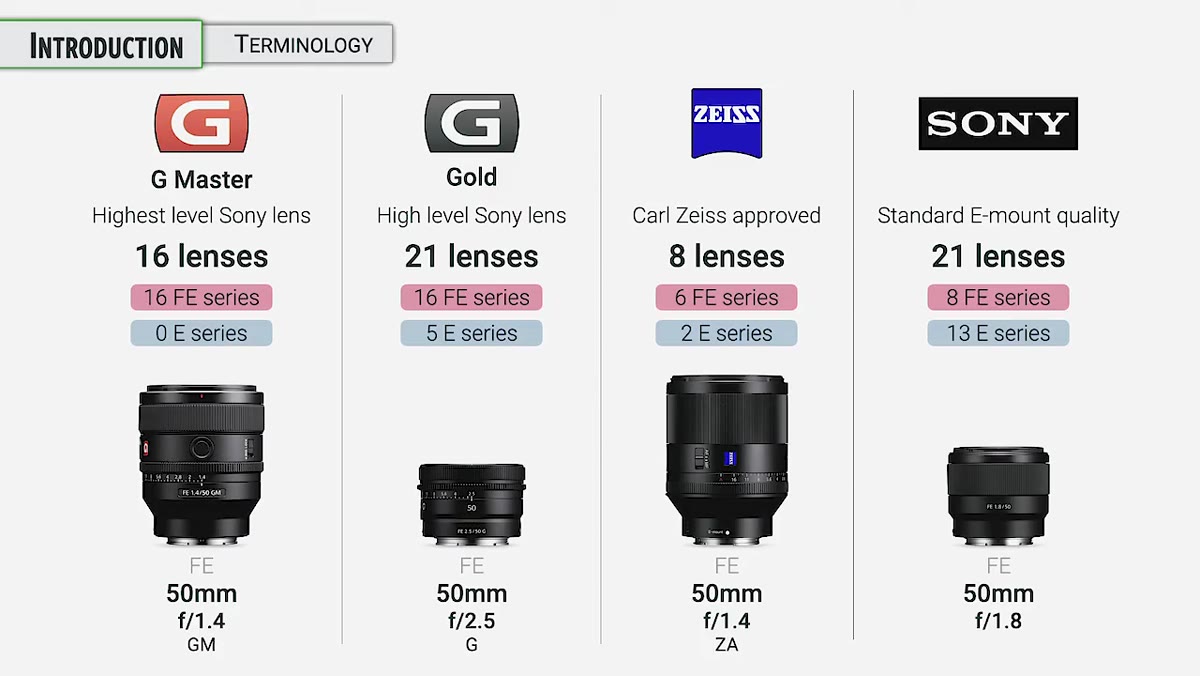
Sony groups its lenses into four distinct tiers, and knowing them tells you immediately what you’re getting before you read a single review. The base tier is standard Sony glass – solid, functional lenses that cover common focal lengths without any special designation. These are the ones most beginners start with, and honestly, for a lot of use cases, they’re completely sufficient. The second tier is the Zeiss-certified lineup, which Sony produced in partnership with Carl Zeiss during the early years of building out the Alpha system. Zeiss is a German optical company with a reputation that goes back over a century, and their name on a lens historically signals exceptional optical quality. The exact nature of the collaboration – whether Zeiss designed, tested, or simply approved the optical formula – was never made fully transparent, but the lenses met Zeiss standards and that meant something real.
Sony lens series categories listed on screen
Sony groups its lenses into four distinct tiers, and knowing them tells you immediately what you’re getting before you read a single review. The base tier is standard Sony glass – solid, functional lenses that cover common focal lengths without any special designation. These are the ones most beginners start with, and honestly, for a lot of use cases, they’re completely sufficient. The second tier is the Zeiss-certified lineup, which Sony produced in partnership with Carl Zeiss during the early years of building out the Alpha system. Zeiss is a German optical company with a reputation that goes back over a century, and their name on a lens historically signals exceptional optical quality. The exact nature of the collaboration – whether Zeiss designed, tested, or simply approved the optical formula – was never made fully transparent, but the lenses met Zeiss standards and that meant something real.
Step 3: Recognize the G Series and What “Gold” Actually Meant
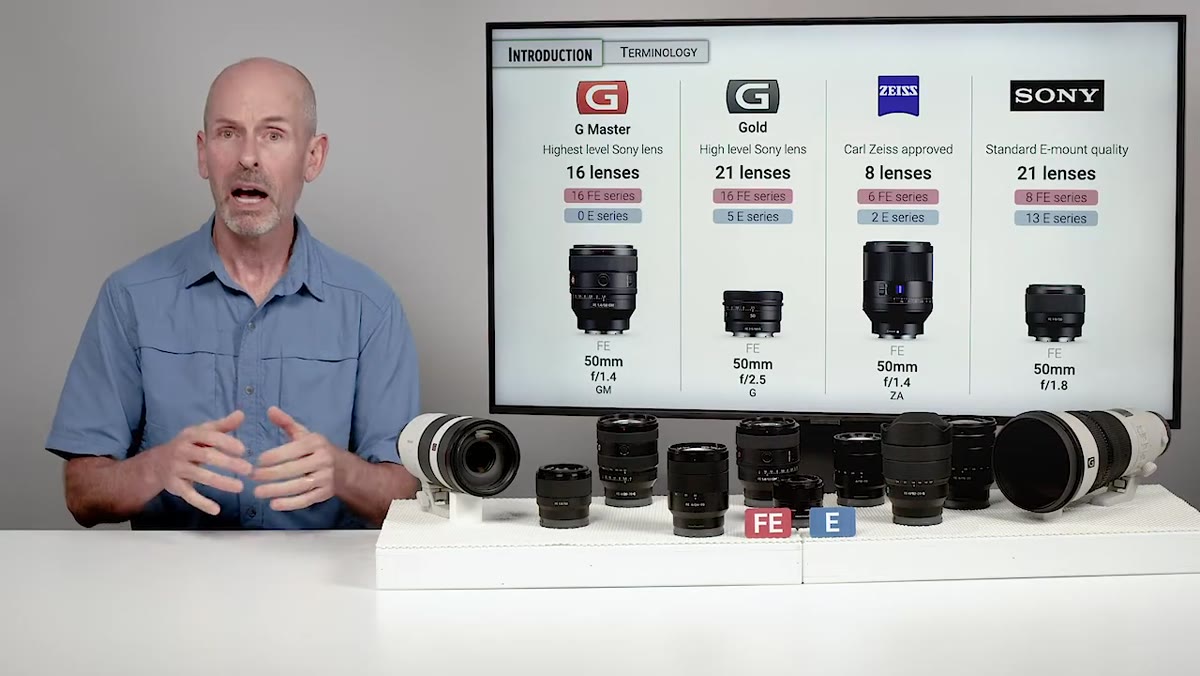 G lens designation explained with Sony branding context
The third tier is Sony’s G series, and this one has a history that predates Sony’s camera division entirely. When Minolta was making cameras, they wanted a premium lens line to compete at the top end. They called these their “Gold” lenses – premium optics, premium price, a step above everything else in the lineup. When Sony acquired Minolta’s camera assets, they kept the designation and continued developing it. The G name stuck even though the gold color coding and gold barrel rings did not. Today, a G designation means you’re looking at a higher-specification Sony lens with tighter tolerances, better build quality, and generally stronger optical performance than the base tier. It’s not the top of the mountain, but it’s well above the foothills.
G lens designation explained with Sony branding context
The third tier is Sony’s G series, and this one has a history that predates Sony’s camera division entirely. When Minolta was making cameras, they wanted a premium lens line to compete at the top end. They called these their “Gold” lenses – premium optics, premium price, a step above everything else in the lineup. When Sony acquired Minolta’s camera assets, they kept the designation and continued developing it. The G name stuck even though the gold color coding and gold barrel rings did not. Today, a G designation means you’re looking at a higher-specification Sony lens with tighter tolerances, better build quality, and generally stronger optical performance than the base tier. It’s not the top of the mountain, but it’s well above the foothills.
Step 4: Know When You’ve Hit the Top – G Master
 G Master series introduced as Sony’s highest internal lens standard
After years of building their own optical engineering capability and going through the Zeiss approval process, Sony decided to create an entirely internal benchmark that would sit above everything else. That’s the G Master (GM) line. These lenses represent Sony’s own maximum standard – the sharpest glass, the best autofocus systems, the most durable weather sealing. Greengo frames this as a natural evolution: Sony started by borrowing Zeiss credibility, developed real in-house expertise, and then set their own bar. For working photographers, GM lenses are genuinely exceptional. For everyone else, they’re worth knowing about but not necessarily worth the price premium unless you’re shooting professionally and billing clients.
G Master series introduced as Sony’s highest internal lens standard
After years of building their own optical engineering capability and going through the Zeiss approval process, Sony decided to create an entirely internal benchmark that would sit above everything else. That’s the G Master (GM) line. These lenses represent Sony’s own maximum standard – the sharpest glass, the best autofocus systems, the most durable weather sealing. Greengo frames this as a natural evolution: Sony started by borrowing Zeiss credibility, developed real in-house expertise, and then set their own bar. For working photographers, GM lenses are genuinely exceptional. For everyone else, they’re worth knowing about but not necessarily worth the price premium unless you’re shooting professionally and billing clients.
Step 5: Cross-Reference the Tier Against Your Actual Use Case
 Full lens lineup overview showing volume differences between FE and E categories
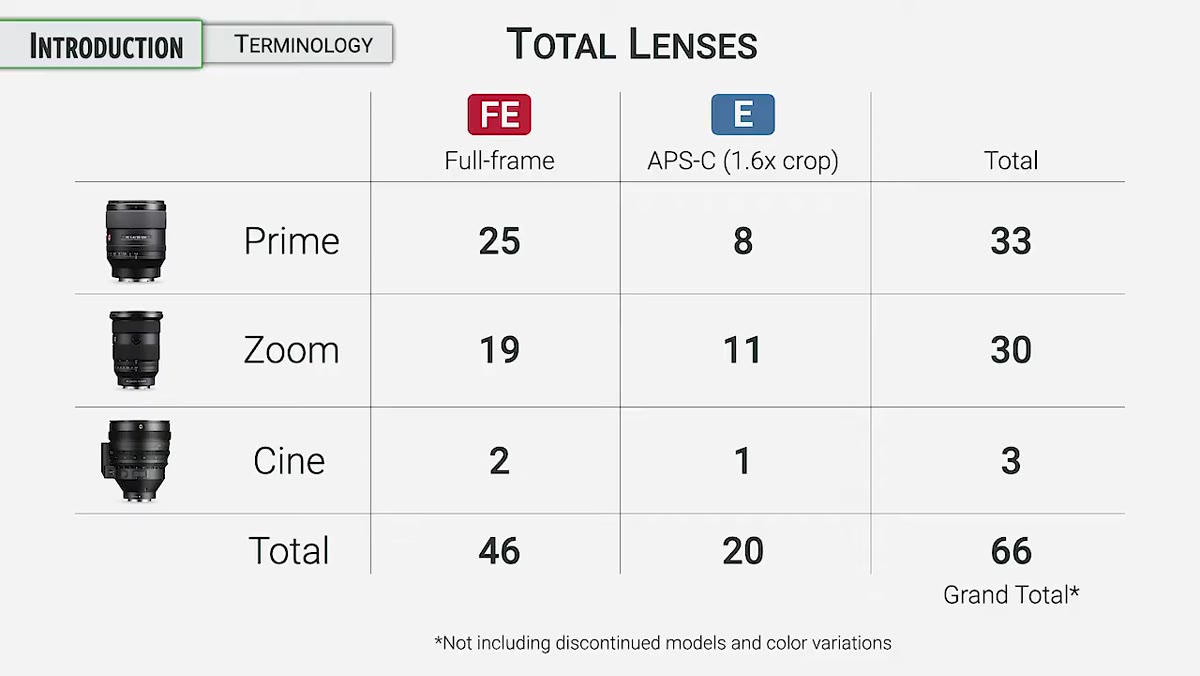
One thing Greengo’s overview makes clear is that the FE ecosystem has significantly more options across all tiers than the E-series lineup. That’s a reflection of where the market has gone – serious photographers with professional budgets have largely moved to full-frame, and manufacturers follow the money. But here’s what that means practically for a crop-sensor shooter: your lens choices at the higher tiers are more limited in native E-mount, which is actually a reasonable argument for going straight to FE glass even on an APS-C body. You get more options, more used inventory, and better resale value down the line.
Full lens lineup overview showing volume differences between FE and E categories
One thing Greengo’s overview makes clear is that the FE ecosystem has significantly more options across all tiers than the E-series lineup. That’s a reflection of where the market has gone – serious photographers with professional budgets have largely moved to full-frame, and manufacturers follow the money. But here’s what that means practically for a crop-sensor shooter: your lens choices at the higher tiers are more limited in native E-mount, which is actually a reasonable argument for going straight to FE glass even on an APS-C body. You get more options, more used inventory, and better resale value down the line.
What I’d Add: The Used Market Changes the Tier Math Completely
I have a spreadsheet – yes, an actual spreadsheet – where I track every lens I’ve ever tested against its street price. The single biggest pattern I’ve noticed is that Zeiss-certified Sony lenses from the early Alpha days are dramatically undervalued on the used market right now. Buyers see that they’re not G or GM and assume they’re second-rate. They’re not. Those lenses were built to a genuinely high optical standard and the only thing that’s changed is Sony’s marketing hierarchy. I’ve shot the 35mm f/2.8 Zeiss FE lens against much more expensive alternatives and struggled to find meaningful differences in real-world results. Before you budget for a new G-series lens, spend 20 minutes on the used listings. You might find a Zeiss-tier Sony lens for half the price that delivers 90% of the performance.
The single most useful thing to take from Greengo’s tutorial is this: those letters on the barrel are a map, not a ranking of your worth as a photographer. Once you understand what FE versus E means for your system, and once you can place G Master, G, Zeiss, and base-tier Sony lenses on a spectrum, you can make buying decisions based on your actual needs and budget rather than chasing the most impressive acronym on the listing.
Watch the full tutorial on YouTube – Greengo goes deeper into specific optical technologies and autofocus designations that I’ll be covering in a follow-up piece.
Comments (2)
Just subscribed. If the rest of your content is this good, I'm in.
Tried this technique this morning. Game changer for real.
Leave a Comment