
I’ve spent years telling people that expensive gear is mostly marketing. But tilt-shift lenses are one of those cases where the tool genuinely does something no other tool can do, and I’ve been meaning to properly sit down and understand the mechanics rather than just knowing the rough idea. The problem I kept running into was landscapes. Flowers or grass in the foreground, mountains or trees in the background, and no matter how aggressively I stopped down, something was always soft. I was either fighting diffraction at f/22 or losing the foreground at f/8. There had to be a better way.
In this John Greengo tutorial, part of his “Focus: Sharpen Your Skills” series, he walks through exactly how tilting a lens solves that problem at a mechanical level. Greengo has been studying tilt-shift lenses for over a decade and even produced a dedicated seven-hour course on the subject, so this is the condensed version of a serious deep dive. Watch the full tutorial on YouTube if you want to follow along while you read.
Step 1: Understand What “Tilt-Shift” Actually Covers
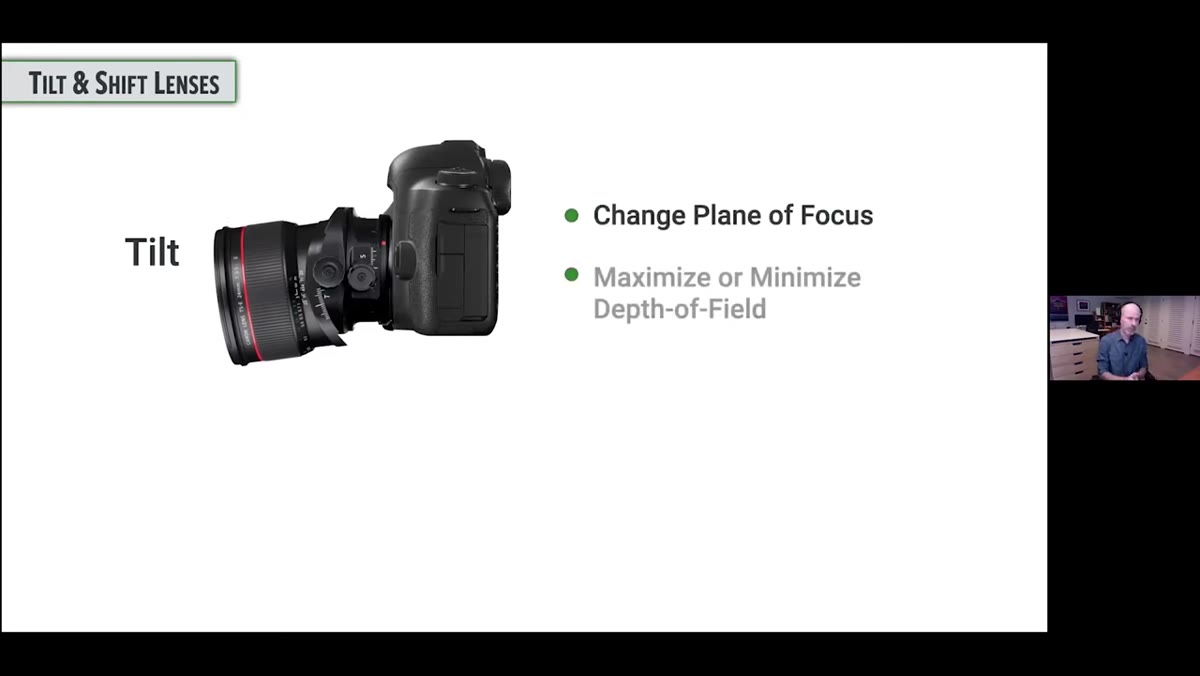 Diagram showing tilt and shift as two separate lens functions
Tilt-shift is a category name that gets used loosely, and that looseness causes real confusion when you’re shopping. Greengo is clear about this: the “tilt” function changes your plane of focus, letting you either maximize or minimize what appears sharp. The “shift” function is about perspective control, physically moving the lens up, down, or side to side to correct converging lines, like when you’re photographing a building from street level and the walls appear to lean inward.
Diagram showing tilt and shift as two separate lens functions
Tilt-shift is a category name that gets used loosely, and that looseness causes real confusion when you’re shopping. Greengo is clear about this: the “tilt” function changes your plane of focus, letting you either maximize or minimize what appears sharp. The “shift” function is about perspective control, physically moving the lens up, down, or side to side to correct converging lines, like when you’re photographing a building from street level and the walls appear to lean inward.
Here’s the important caveat he flags early: many lenses sold as “perspective control” lenses do the shift but not the tilt. If you’re buying specifically for the focus plane manipulation he’s demonstrating, you need to confirm the lens tilts. Don’t assume. Check the spec sheet.
Step 2: Recognize the Limitation Tilt Is Solving
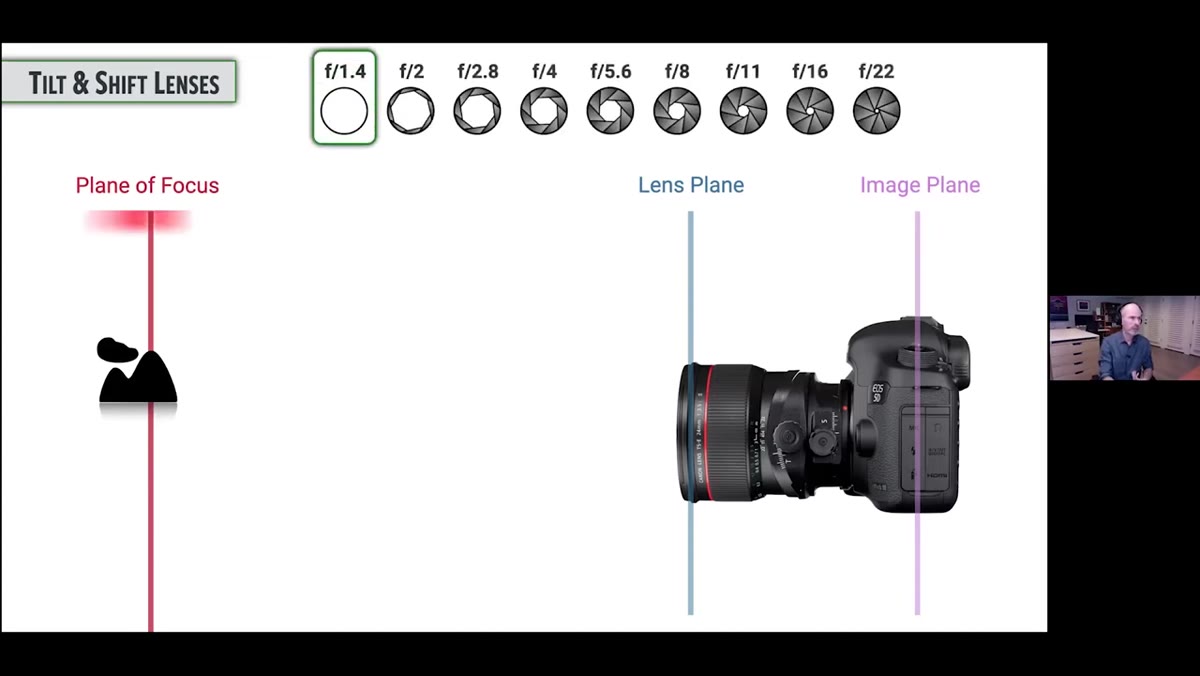 Graphic showing parallel imaging plane, lens plane, and focus plane
With any standard lens, whether it’s a prime, zoom, or macro, three planes always stay parallel to each other: the imaging plane (your sensor), the lens plane, and the focus plane. When you turn the focus ring, the focus plane moves closer or farther from the camera, but it always stays flat and parallel to your sensor. That’s the only variable you’re working with.
Graphic showing parallel imaging plane, lens plane, and focus plane
With any standard lens, whether it’s a prime, zoom, or macro, three planes always stay parallel to each other: the imaging plane (your sensor), the lens plane, and the focus plane. When you turn the focus ring, the focus plane moves closer or farther from the camera, but it always stays flat and parallel to your sensor. That’s the only variable you’re working with.
The practical problem this creates: if your subject runs diagonally away from the camera, like a row of flowers stretching from three feet away to thirty feet away, no single flat focus plane can cover all of it. You’re stuck choosing between stopping down to a small aperture with its diffraction penalty, doing focus stacking (which requires multiple frames and a still subject), or accepting that part of the scene will be soft.
Step 3: See How Tilting the Lens Breaks the Parallel Rule
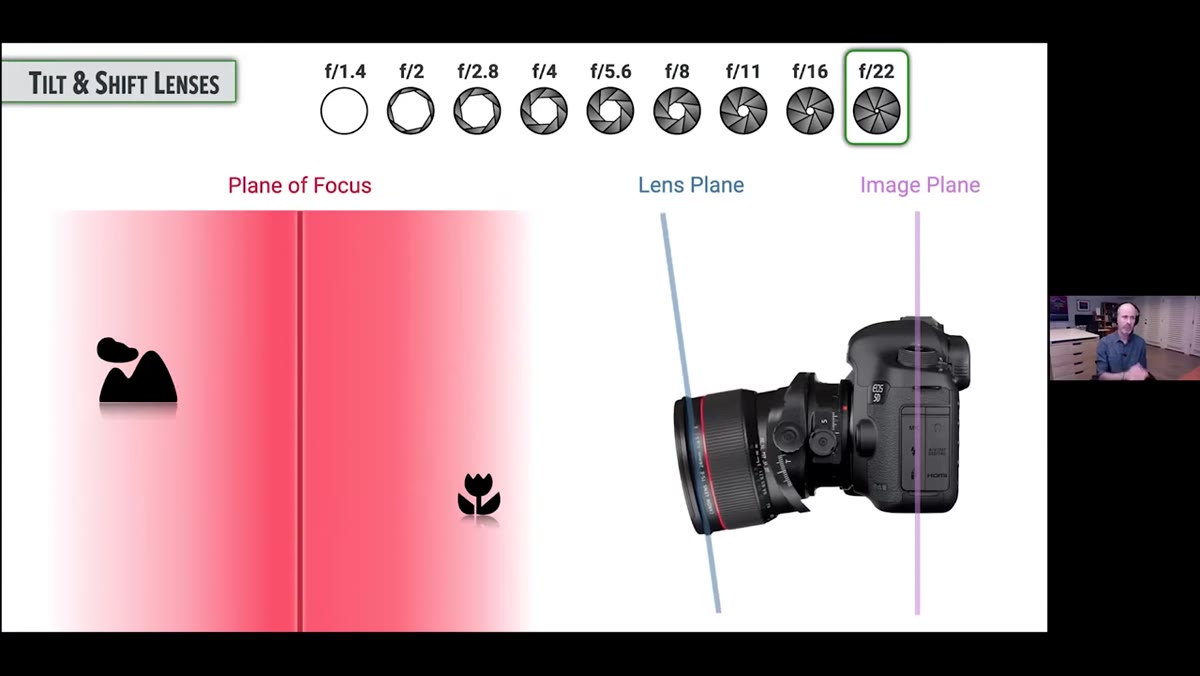 Animation showing lens plane tilting and focus plane rotating dramatically
When you physically tilt the front element of the lens, the focus plane stops being parallel to the sensor. It rotates. And here’s the counterintuitive part that Greengo emphasizes: the focus plane doesn’t tilt by the same amount as the lens. It tilts by significantly more. A small physical tilt of the lens produces a dramatic rotation of the focus plane, which is what makes the technique so powerful even with modest adjustments.
Animation showing lens plane tilting and focus plane rotating dramatically
When you physically tilt the front element of the lens, the focus plane stops being parallel to the sensor. It rotates. And here’s the counterintuitive part that Greengo emphasizes: the focus plane doesn’t tilt by the same amount as the lens. It tilts by significantly more. A small physical tilt of the lens produces a dramatic rotation of the focus plane, which is what makes the technique so powerful even with modest adjustments.
This is the core mechanical insight that unlocks the whole technique. You’re not just nudging things slightly. You’re fundamentally redirecting where sharpness lives in three-dimensional space.
Step 4: Use the Tilted Plane to Cover Near-to-Far Subjects in One Shot
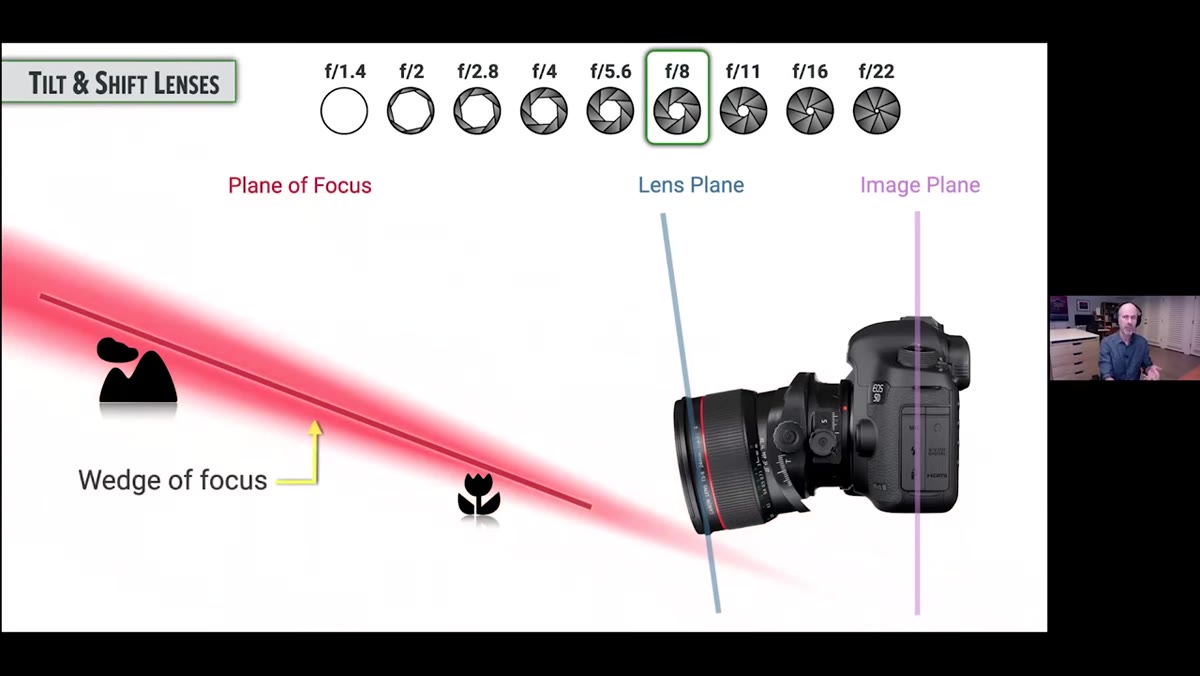 Illustration of wedge-shaped focus zone covering foreground flowers and distant mountains
Once the focus plane rotates to run along the natural plane of your scene, rather than cutting across it perpendicular to the camera, you can get foreground and background sharp in a single frame without stopping down to f/22. Greengo’s example is foreground wildflowers and a distant mountain range, both sharp, shot at f/8 where the lens is actually performing at its optical best.
Illustration of wedge-shaped focus zone covering foreground flowers and distant mountains
Once the focus plane rotates to run along the natural plane of your scene, rather than cutting across it perpendicular to the camera, you can get foreground and background sharp in a single frame without stopping down to f/22. Greengo’s example is foreground wildflowers and a distant mountain range, both sharp, shot at f/8 where the lens is actually performing at its optical best.
The practical target aperture range here is important. Tilt-shift technique isn’t just about the tilt itself. It’s about getting sharpness at a middle aperture where diffraction is not yet a problem. f/8 to f/11 is typically where most lenses peak in sharpness. The tilt makes that possible on subjects that would otherwise force you to f/16 or f/22.
Step 5: Account for the Shape of the Focus Zone
 Wedge diagram showing narrower focus zone in foreground, wider in background
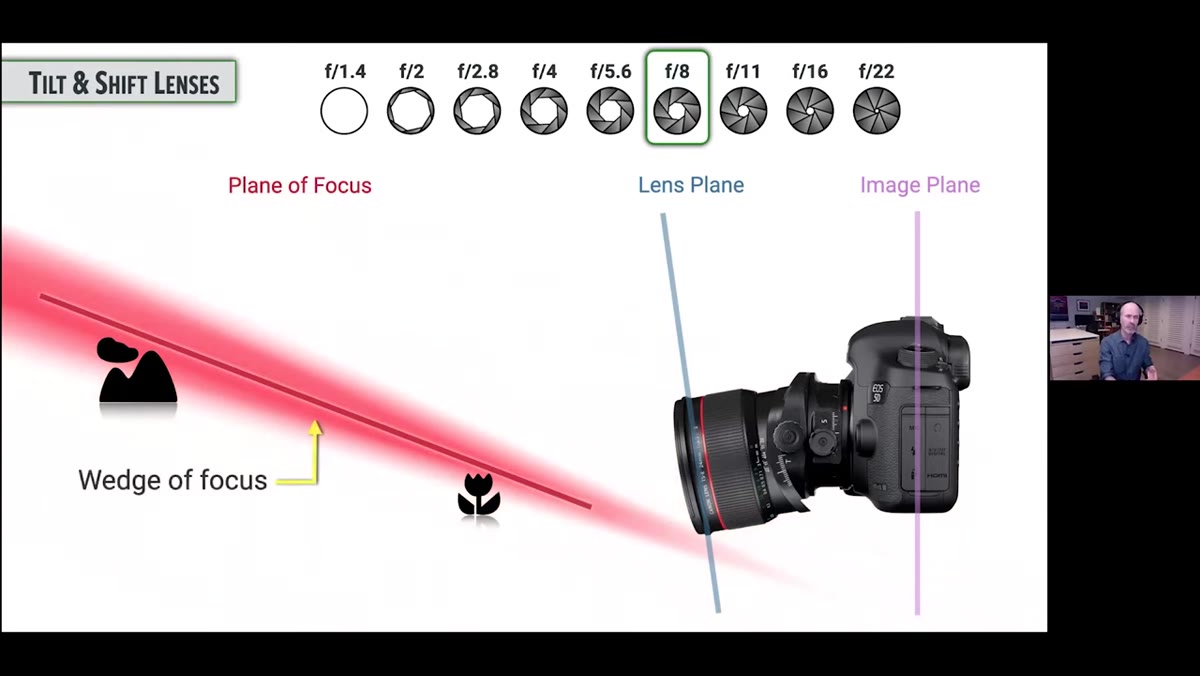
The focus zone created by tilting isn’t a perfectly flat plane like a table. It’s more of a wedge shape: narrower closer to the camera, widening as it extends into the background. Greengo is specific about this because it affects how you compose and where you place subjects.
Wedge diagram showing narrower focus zone in foreground, wider in background
The focus zone created by tilting isn’t a perfectly flat plane like a table. It’s more of a wedge shape: narrower closer to the camera, widening as it extends into the background. Greengo is specific about this because it affects how you compose and where you place subjects.
If a single flower stalk or a tree branch grows above the angled plane you’ve established, it will be out of focus and it might look odd depending on the image. This isn’t a flaw to avoid at all costs. Sometimes that selective softness looks intentional and interesting. But you need to understand it’s happening so you can decide whether to embrace it or reframe your shot to keep your main subjects inside the focus wedge.
Step 6: Know That Shift Has Its Own Separate Use Cases
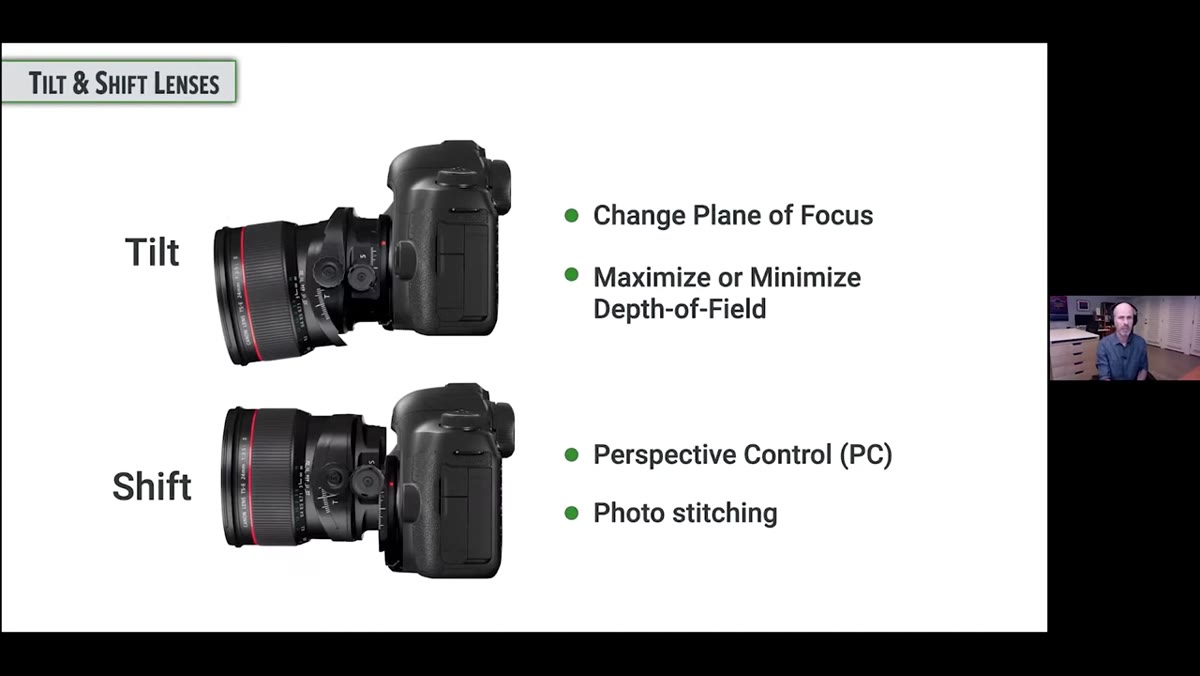 Diagram showing lens shifting upward to correct perspective on a building
Greengo covers the shift function separately, and it’s worth keeping them mentally distinct. Shifting the lens is what architectural photographers use to photograph buildings without tilting the camera up, which is what causes vertical lines to converge and make walls look like they’re falling backward. By keeping the camera perfectly level and shifting the lens upward instead, you capture the upper portion of a building without introducing perspective distortion.
Diagram showing lens shifting upward to correct perspective on a building
Greengo covers the shift function separately, and it’s worth keeping them mentally distinct. Shifting the lens is what architectural photographers use to photograph buildings without tilting the camera up, which is what causes vertical lines to converge and make walls look like they’re falling backward. By keeping the camera perfectly level and shifting the lens upward instead, you capture the upper portion of a building without introducing perspective distortion.
Shift also has a less obvious application: panorama stitching. By shifting the lens left and right across a scene without rotating the camera body, you produce a set of frames with nearly zero parallax error, which makes stitching cleaner than rotating a standard lens on a tripod head. If you’re chasing high-megapixel wide-angle shots, this is a legitimate reason to consider a shift-capable lens even if you never touch the tilt function.
What I’d Add from My Own Testing
I haven’t personally owned a tilt-shift lens. At their price points, they’re well outside what I usually cover here. But what I’ve taken from studying how the technique works is that understanding the plane of focus mechanically makes you better at using every lens you already own. Knowing why stopping down doesn’t infinitely solve your near-to-far sharpness problem, and understanding what the alternatives are, makes you a smarter decision-maker in the field. I’ve started thinking about my focus plane as a physical object in space that I can reposition, not just a number on a scale, and that mental shift (no pun intended) has changed how I approach wide scenes even when I’m shooting with a standard kit lens.
Tilt-shift gear is genuinely niche. Most photographers will never need it. But the conceptual model Greengo teaches here, that the focus plane is a geometric object you can manipulate, not just a setting you scroll past, is worth internalizing regardless of what’s in your bag.
The single most useful thing to take from this tutorial: stopping down is not the only answer to near-to-far sharpness problems, and understanding the alternatives will make you a more deliberate shooter at every aperture. Watch the full tutorial on YouTube to see Greengo walk through the geometry with his own diagrams.
Comments
Leave a Comment